Data Engineering
The Data engineering section (icon bar, key general.dataEngineering) has exactly two sub-links that let you manage database objects without working directly in the database:
- View persistence (
/dataengineering/viewpersistence) — materialize views into tables. - Database objects (
/dataengineering/objecthistory) — the object viewer: the object tree, the current SQL definition, version comparison and the right-click menu for adding objects to a change.
The full list of app screens with their route and fields is in Web app screens.
View persistence
A persisted (materialized) view stores the result of a view query in an actual table. That way reports read straight from a table instead of recomputing a (potentially slow) view every time. The screen reads from the view Loadmanagement.vwViewPersistence and lets you manage the configuration and start the Materialize View pipeline.
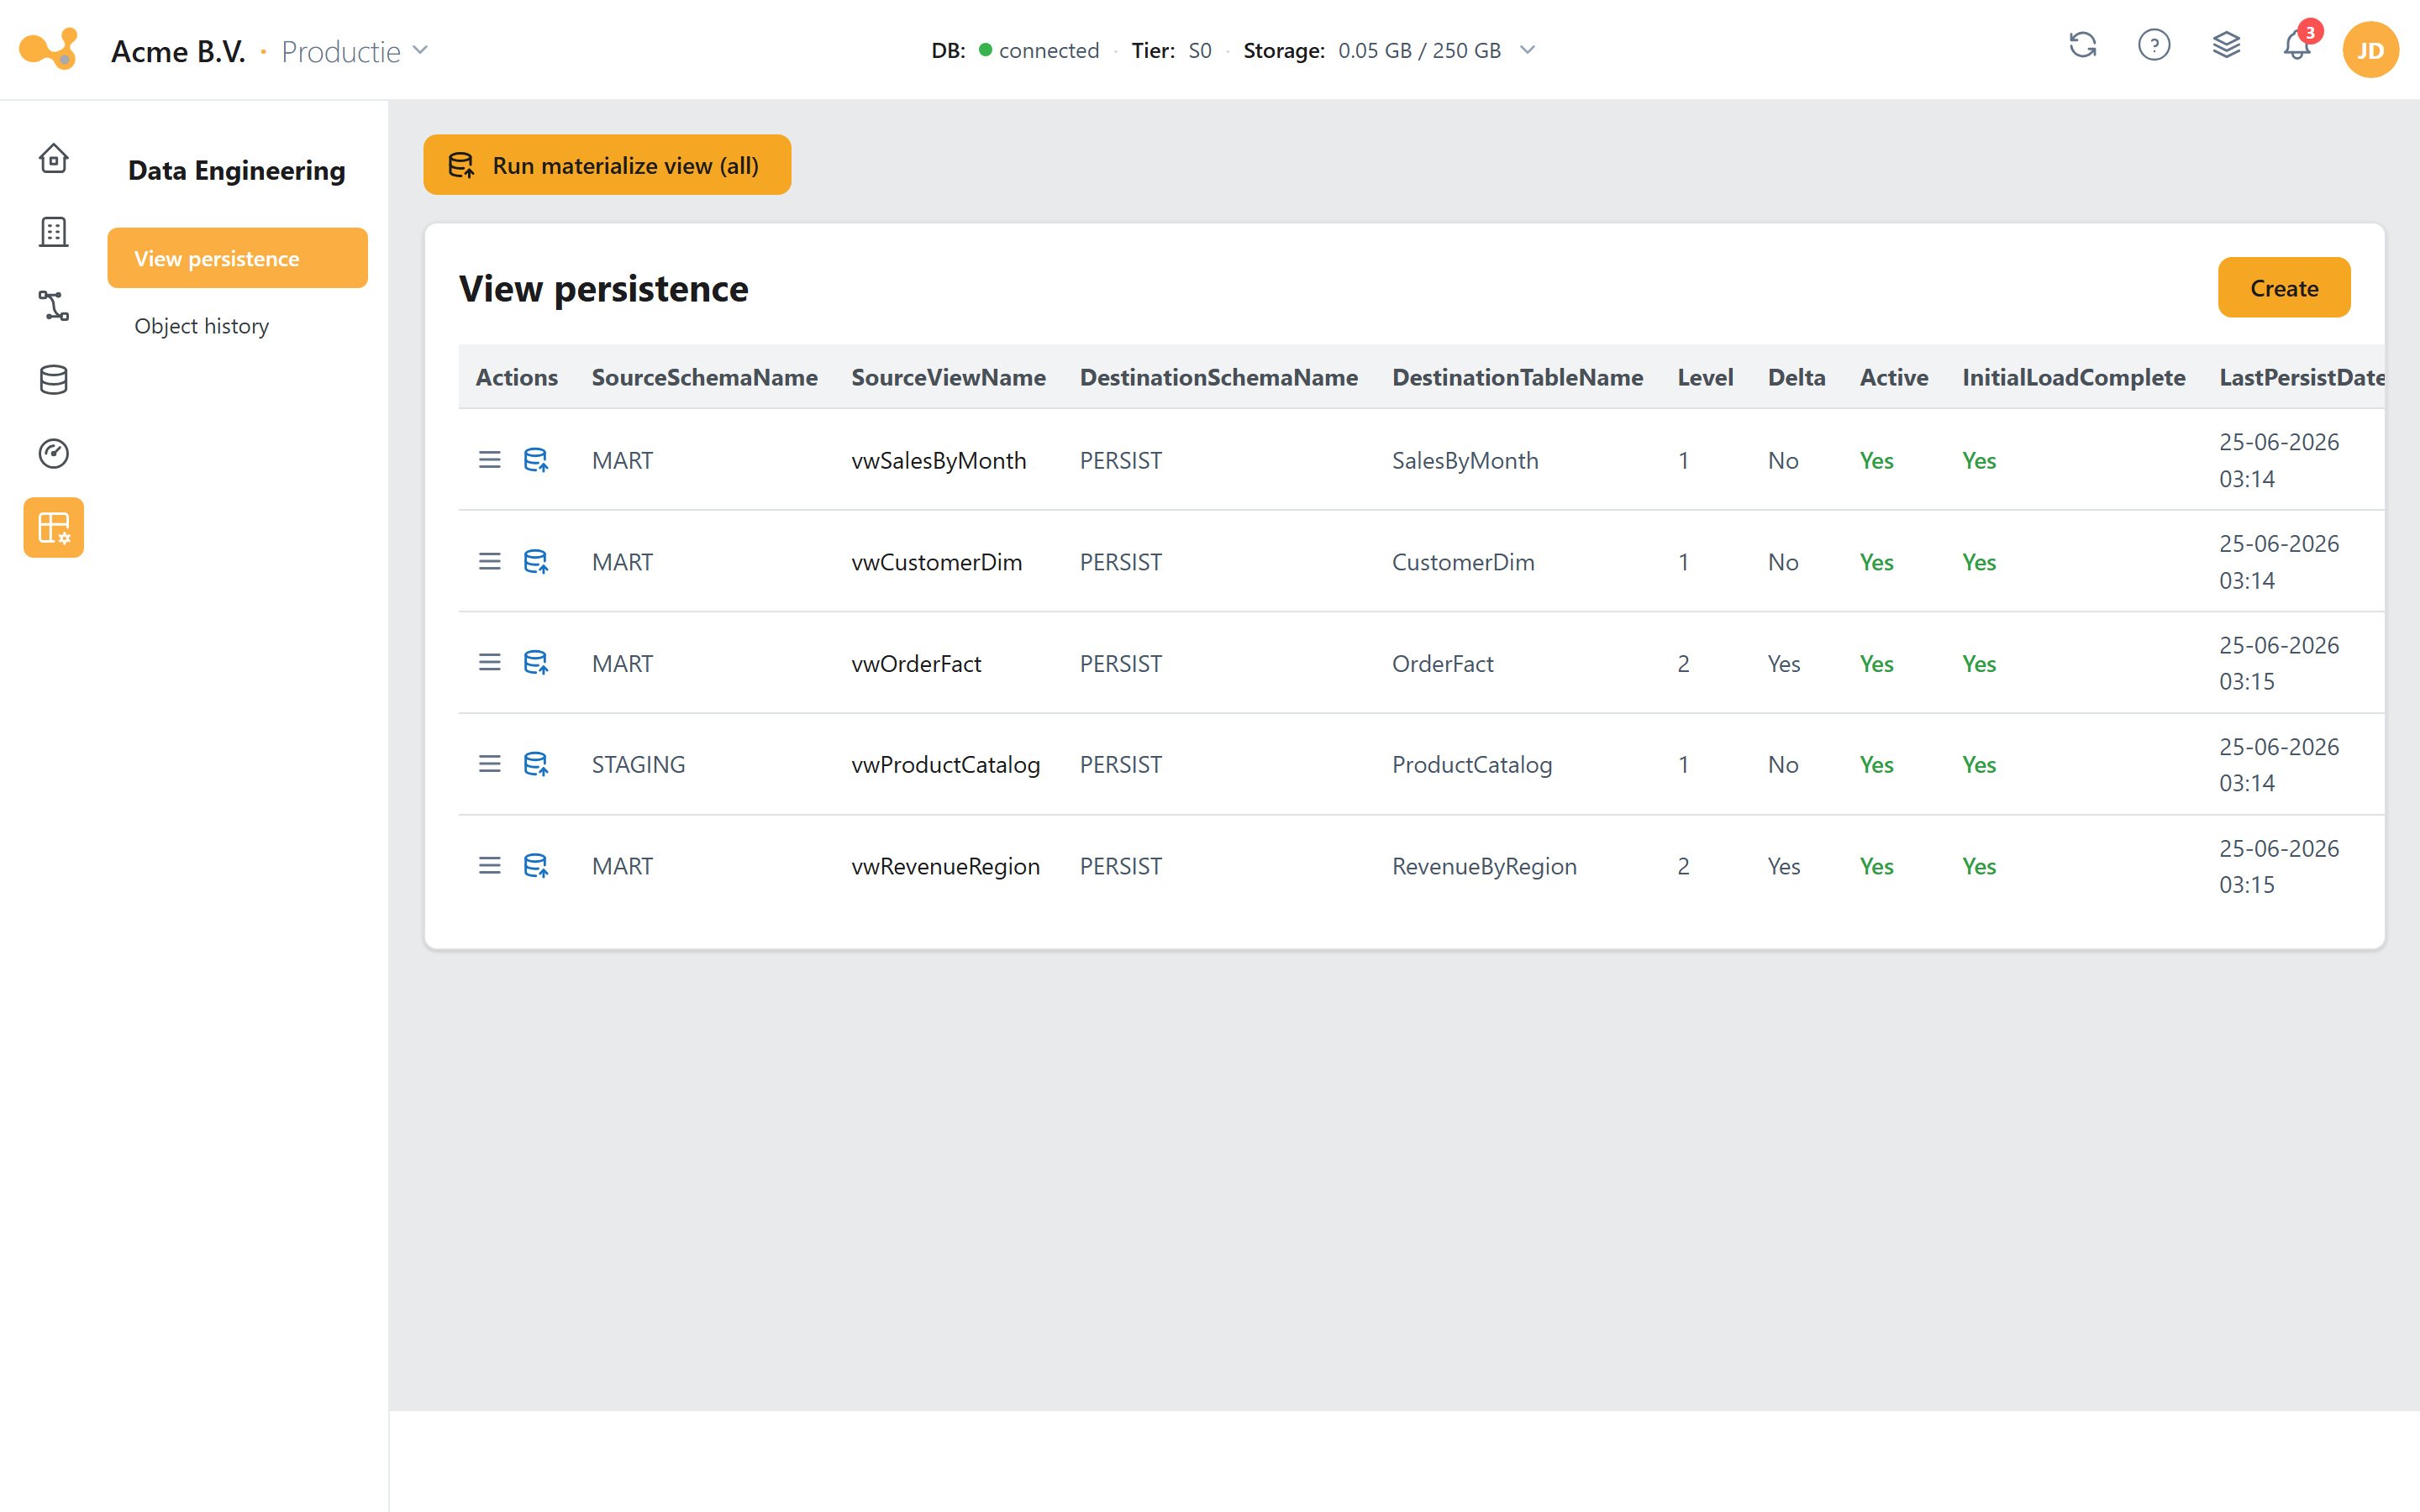
The View persistence screen: on the left the section icon bar, next to it the sub-links, and in the main pane the persistence table with the create form below it.
(1) Run materialize view (all) — button in the top right (runMaterializeViewAll). Appears as soon as the Materialize View pipeline exists and runs it for every row in the table.
(2) Persistence table — one row per persisted view, including SourceSchemaName, SourceViewName, DestinationSchemaName, DestinationTableName, Level, Delta, LastPersistDate, LastETLDate and Active.
(3) Run materialize view (per row) — a row action that fills the Materialize View pipeline parameters Schema/Table and opens the ad-hoc runner.
(4) Maintain-persist-view form — create/edit/delete a persisted view (CRUD via MaintainPersistView).
(5) Level + load type — determines the load order and whether the view is updated fully (Full) or incrementally (Delta).
Creating a persisted view
- Click + Add persisted view (or edit an existing row).
- Choose the source:
SourceSchemaName+SourceViewName— the view you want to materialize. - Choose the destination:
DestinationSchemaName+DestinationTableName— the table where the result is stored. - Set the Level (see below).
- Choose the load type (
FullorDelta); forDeltayou specify the source object and theDeltaColumn. - Save. Then materialize right away with Run materialize view (per row or for all rows).
Level — the load order
Level determines the order in which persisted views are materialized. That matters when one view depends on another:
- If view B depends on view A, give A
Level 0and BLevel 1. - A is then materialized first, so that B has an up-to-date source.
Views with a lower level are processed first. For independent views the level doesn't matter.
Full vs. Delta
The Delta column of the table (and the load type in the form) shows how the view is updated:
| Mode | What happens |
|---|---|
| Full | The entire view is re-materialized into the destination table on every run. |
| Delta | Only changed records are updated, tracked via a source object (view/table) and a DeltaColumn. |
The configuration is stored via MaintainPersistView; the actual materialization is done by the stored procedure [LoadManagement].[spMaterializeViews], which is called by the Materialize View pipeline. The same step also sits as Materialize Views at the end of the standard load workflow, so that persisted views automatically stay current after a load.
Database objects
The Database objects sub-link (/dataengineering/objecthistory) is the object viewer: a tree of all database objects — created by a user and by Yres — where you inspect each object's current SQL definition, compare versions and use a right-click menu to add objects to a change.
This screen is the home for your scripted/custom objects (your own tables, views, stored procedures and functions). You browse your DWH objects here and add a custom object — or an existing database object — to a change directly via the right-click menu (Add to change). There is no separate "Scripted objects" screen anymore; scripted objects are managed here in Database objects.
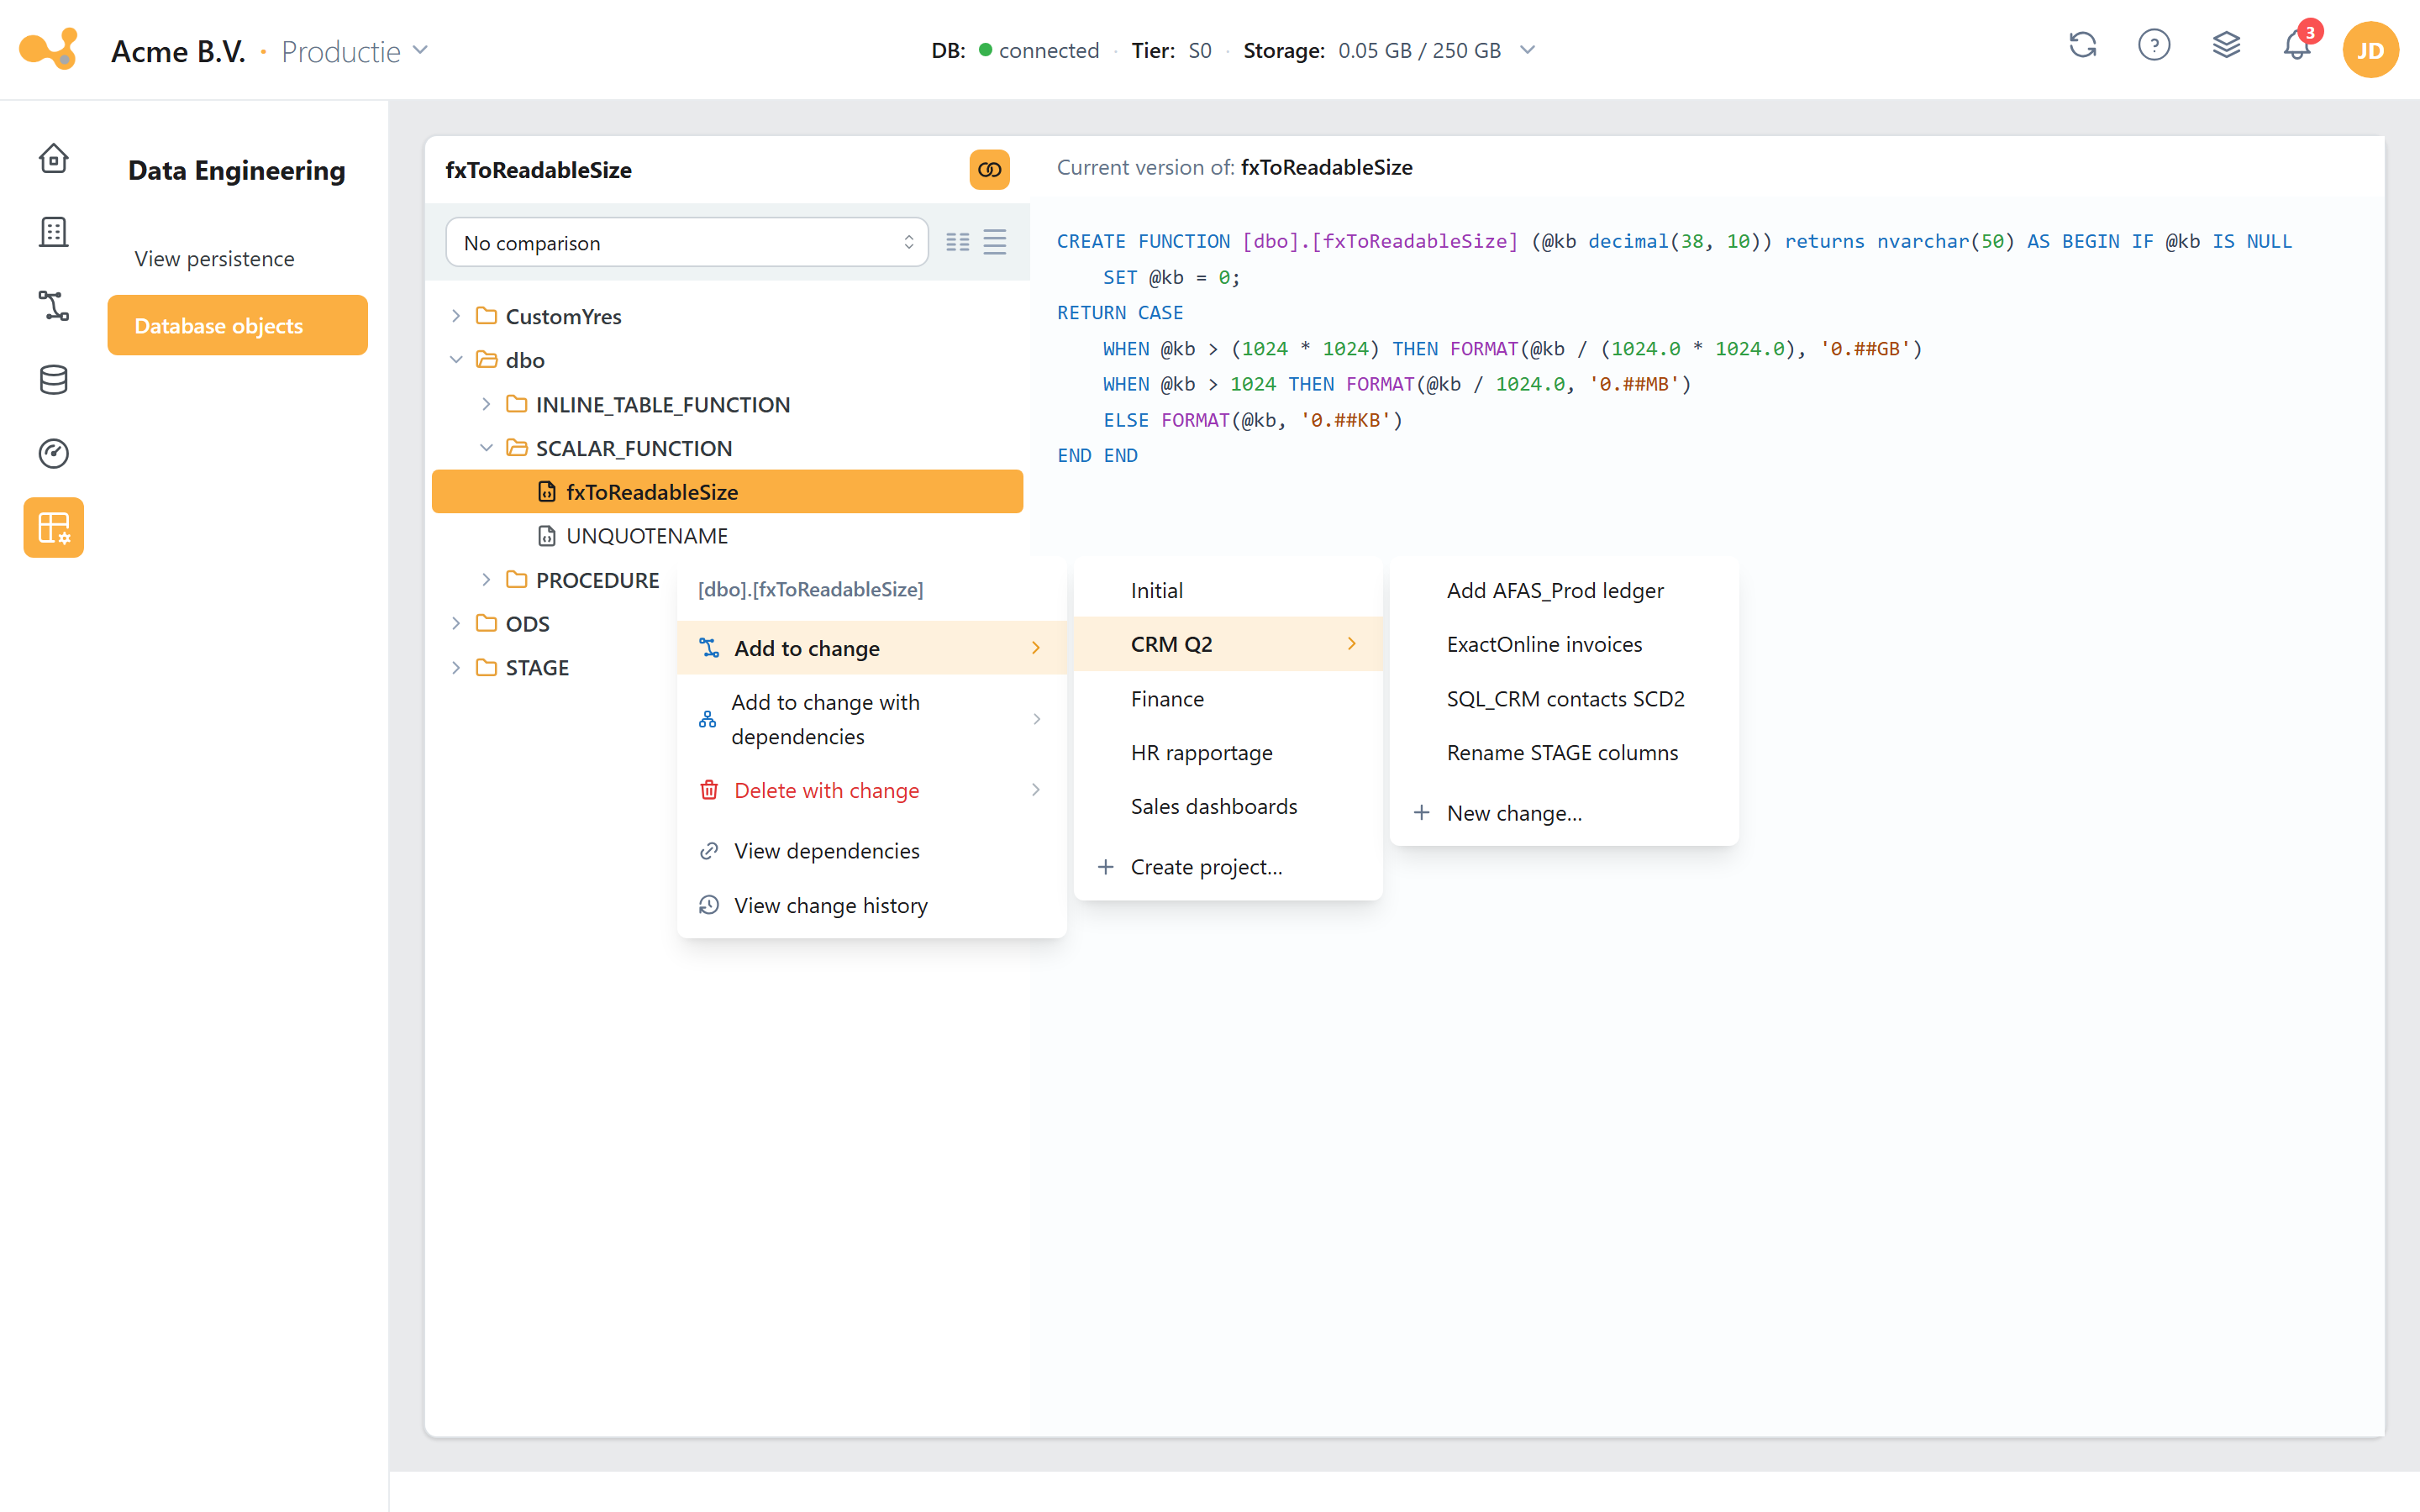
The Database objects screen: the object tree on the left (schema → object type → object), the source pane with the current definition in the middle, the comparison dropdown at the top, and the right-click context menu with the Add-to-change cascade.
(1) Object tree — three levels: schema → object-type folder → object. For example dbo → SCALAR_FUNCTION → fxToReadableSize, or ODS → TABLE → AzureSQL_dbo_attractions. Click an object to load its definition.
(2) Source pane — shows the current SQL definition of the selected object, syntax-highlighted.
(3) "No comparison" / "Compare versions" dropdown (+ layout toggles) — at the top; defaults to "No comparison". Choose Compare versions for a diff.
(4) Version diff — with Compare versions selected, a red/green difference appears between the current version and a previous ALTER (added/removed columns, indexes, and so on).
(5) Right-click context menu — right-click an object for the change and dependency actions (see Adding objects to a change).
Comparing versions
- Select an object in the tree; the source pane shows the current SQL definition.
- Switch the dropdown at the top from No comparison to Compare versions.
- Read the red/green difference between the current version and the previous
ALTER: added lines are green, removed lines are red (for example added or removed columns or indexes). - Use the layout toggles to change how the source and diff panes are displayed.
Adding objects to a change
The right-click menu on an object in the tree is how you add scripted/custom objects — your own tables, views, stored procedures and functions — as well as existing database objects to a change. Right-click an object and choose one of the following actions (the first three have cascading submenus):
- Add to change ▸ — pick a project ▸ pick a change (or New change… / Create project…). The object is added to that change.
- Add to change with dependencies ▸ — the same project → change path, but also includes the object's dependencies.
- Delete with change ▸ — schedules the object's deletion as part of a change.
- View dependencies — opens a dependency graph (React Flow) of what the object depends on and what depends on it, for example
[dbo].[UNQUOTENAME]→[LoadManagement].[fxExtractor]→vwExtractor/spPrepareWorkload. - View change history — opens a modal listing the changes that touched this object (columns Change · Status overview · CreationDate · plus a link to navigate to the change).
Adding to a change is part of the Projects → Changes process, which promotes changes through your DTAP environments in a controlled way. This menu is meant for setups with multiple environments.
Further reading
- History & SCD2 — how Yres tracks history (KeyHash/RowHash,
ETL_Date/ETL_EndDate,IsCurrent,Delta); background on theDeltamode of persisted views. - Load management — where you start individual pipelines, including Persist View (the Materialize Views pipeline).
- Data flow — where the Materialize Views step fits in the overall load workflow.