Projects & Changes
Projects and Changes form the lifecycle management of Yres: you bundle all work on the data warehouse (adding or updating tables, scripted objects, view persistence) into manageable units and then transport those changes in a controlled way from dev through test to prod. This keeps your environments in sync and ensures you never push half-finished work to production.
The entire Projects section (and therefore Changes) is hidden and blocked for organizations with a single environment. The icon bar then does not show Projects, and the backend refuses to create a project or change with the message "is not allowed for organizations with a single environment". With a single environment there is no dev → prod transport needed: changes are applied directly and the wizard internally uses ChangeId 1 automatically.
The full list of app screens with their route and fields is in Web app screens.
The lifecycle in brief
The five steps a change goes through — you trigger every action from the change's actions menu (☰) on the Changes screen; the Where column shows which environment the action runs from:
| Step | What | Where | Behind the scenes |
|---|---|---|---|
| 1 | Create a change under a project and book work into it | Create change · dev | — |
| 2 | release change — lock the change and make it available to install | ☰ → dev submenu · open change | [Change].[spRelease] |
| 3 | Reimport change — re-fetch the change in the target environment (DWH only) | ☰ → prd submenu · released change | [Change].[spImport] |
| 4 | Reinstall change — install the change and publish the ADF factory | ☰ → prd submenu · released change | [Change].[spInstall] + publish-datafactory |
| 5 | publish-datafactory — new pipelines land in the target factory | target environment (test/prod) | Azure DevOps pipeline |
Projects
A project groups changes within an environment and gives the work a name, a description and a due date.
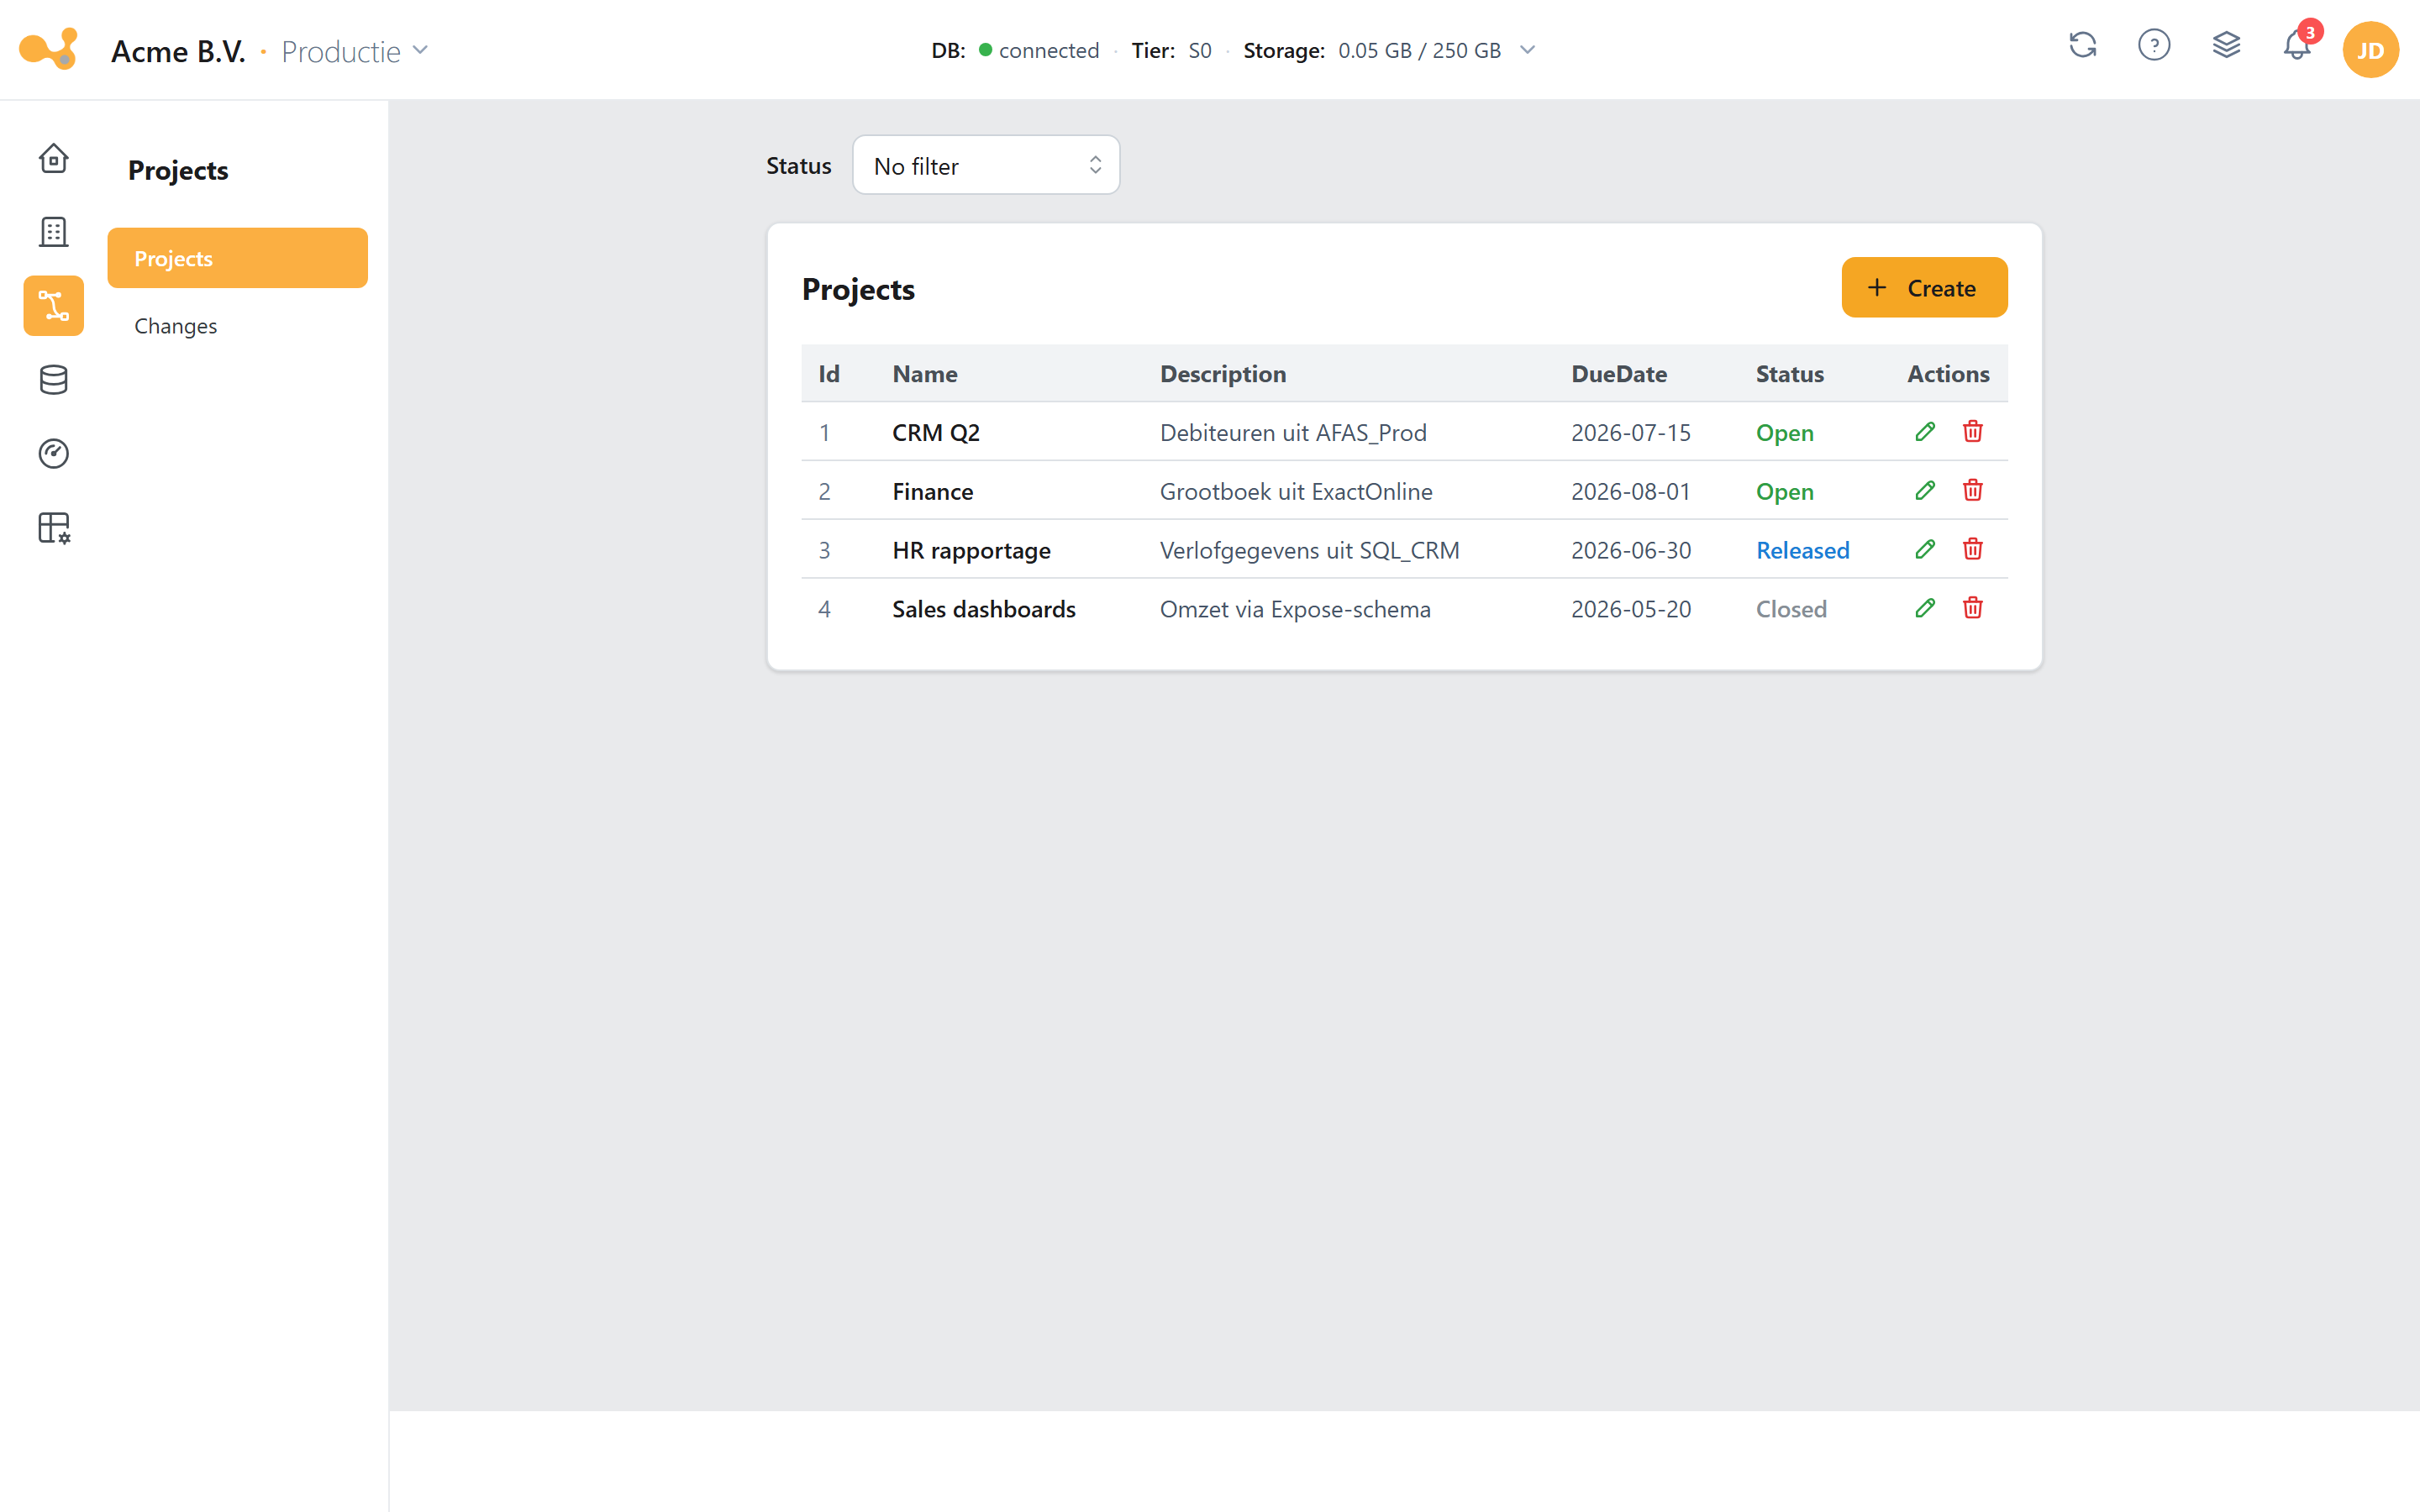
The numbers (1)–(6) in the screenshot refer to:
- Sub-links of the section — Projects and Changes.
- Create project — opens the create form with the fields Name, Description and DueDate.
- Projects table — columns Name, Description, DueDate, Creator and Status.
- Status — the status code is translated into text: 1 Open · 2 Closed · 3 released · 9 Deleted · 99 Discontinued.
- Row actions — edit and delete.
- Single-environment warning — the section is hidden and blocked with a single environment.
Creating a project
- In the Projects section, open the Projects sub-link.
- Click Create project.
- Fill in Name, Description and DueDate and confirm.
- A project cannot be deleted as long as it contains open changes.
- The DueDate of every change under the project must be on or before the DueDate of the project.
Changes
A change categorizes modifications to the data warehouse and is the unit you later release and install. Changes always belong to a project. All data-plane edits in dev are booked under a change (see adding tables in Data sources), so they travel through the environments together. The Changes screen is where everything about changes happens: you filter, read the changes table and run every action — release, (re)import and (re)install — from a change's actions menu (☰). Which actions are available depends on the change's status.
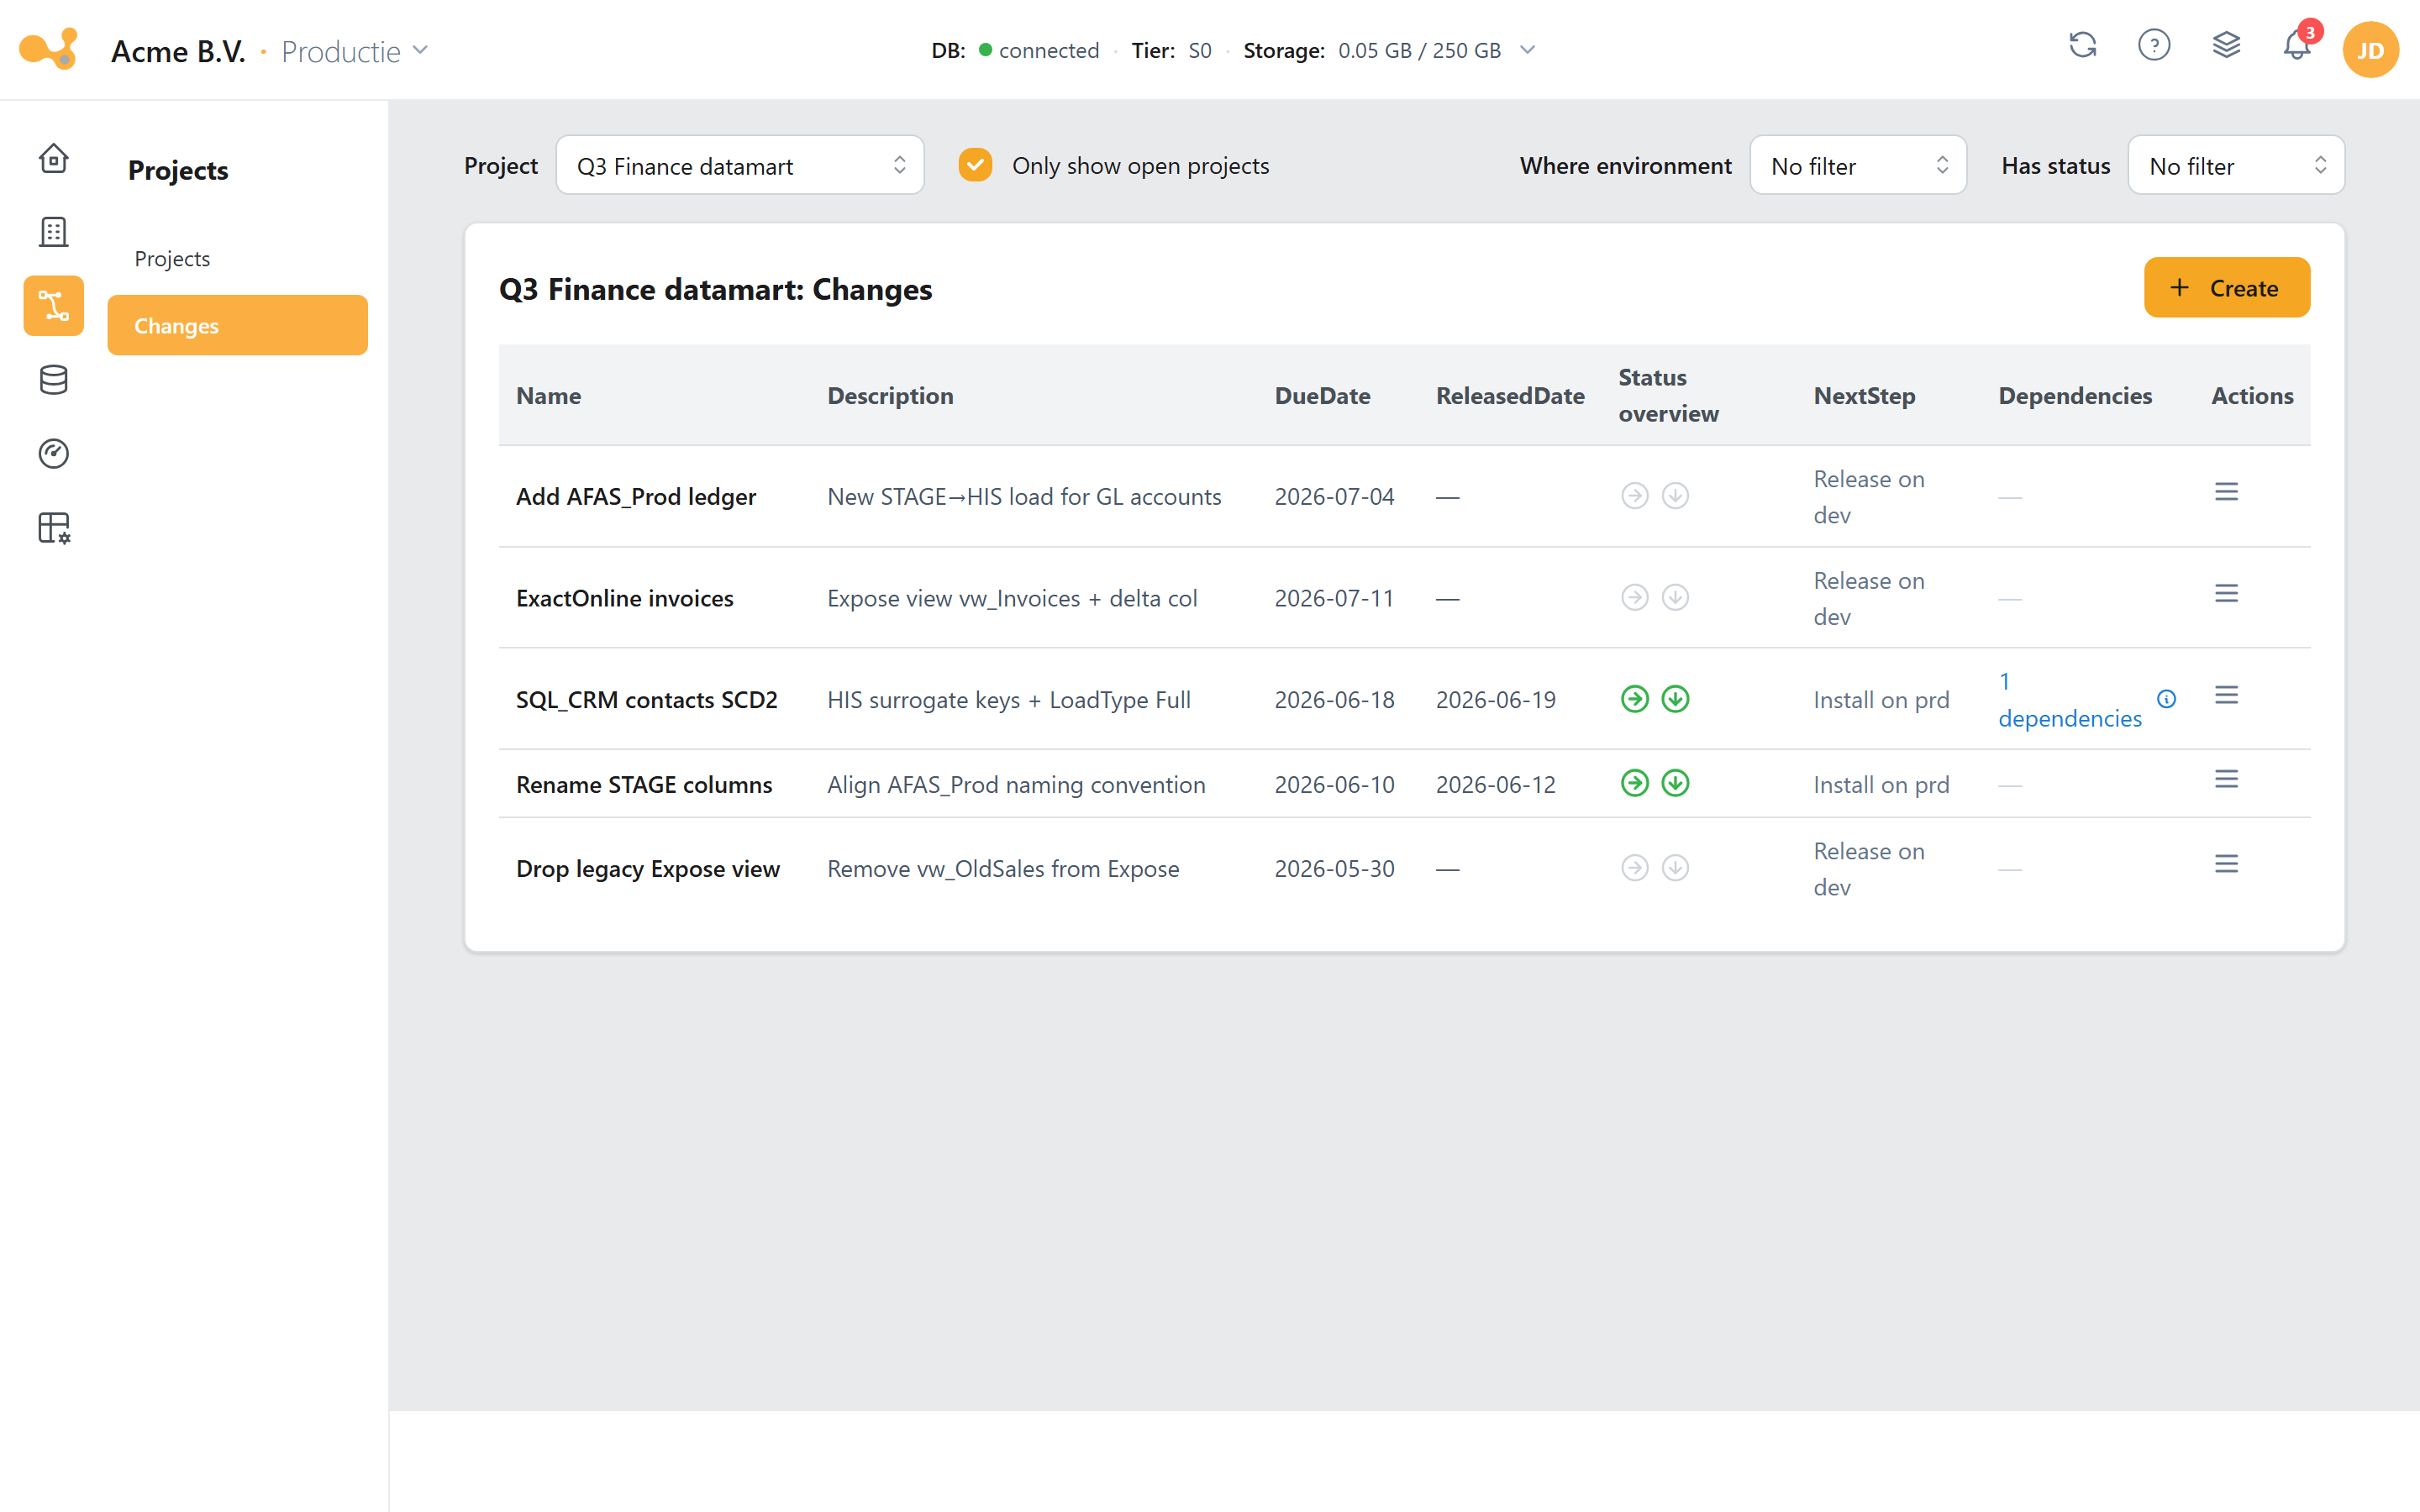
The numbered elements in the screenshot:
- Filters — a Project select, an "Only show open projects" checkbox, and the "Where environment…" and "Has status" filters to narrow the table to changes in a given environment or with a given status.
- Create change — opens the create form (only with an Open project and the right permissions).
- Changes table — columns Name, Description, DueDate, ReleasedDate, Status overview, NextStep, Dependencies and Actions (see below).
- Status overview — a per-environment progress indicator: green when that step has run on the environment, grey while it has not.
- NextStep — the suggested next action for the change, e.g. "Release on dev" or "Install on prd".
- Dependencies — an "N dependencies" link that opens the dependency graph (which changes this one depends on, and their status).
- Actions (☰) — the per-row actions menu; it contains Update, Delete, a per-environment submenu (release / reimport / reinstall), View dependencies and Logs (see Releasing and Installing).
The changes table columns
| Column | What it shows |
|---|---|
| Name / Description | The change's name and description. |
| DueDate | Target date (≤ the parent project's DueDate). |
| ReleasedDate | When the change was released (empty while the change is open). |
| Status overview | A per-environment progress indicator — green = step done on that environment, grey = not yet. |
| NextStep | The suggested next action, e.g. "Release on dev" or "Install on prd". |
| Dependencies | An "N dependencies" link that opens the dependency graph. |
| Actions | The actions menu (☰) per change — see the actions menu. |
Creating a change
- Open the Changes sub-link and choose a project at the top.
- Click Create change (only visible with an Open project and the right permissions).
- Give the change a Name, Description and DueDate and confirm.
The DueDate of a change must be on or before the DueDate of the parent project.
Scripted Objects
Custom SQL objects that were not generated by Yres — your own tables, views, stored procedures and functions — are managed from Database objects: the database-object tree under Data Engineering. There you browse your DWH objects and add a custom object — or include an existing database object — into a change directly from the explorer. There is no separate "Scripted objects" screen anymore; scripted/custom objects live in Database objects and travel via the change when releasing and installing to test and prod.
- Under Data Engineering, open Database objects and right-click an object to add it — with or without dependencies, and optionally with content — to a change. See Adding objects to a change.
- For a custom table you choose whether the table's content travels along (behind the scenes:
[Change].[spCopyTableContent]).
The actions menu (☰)
Releasing, (re)importing and (re)installing all happen via the actions menu (☰) that every change row in the table has. There are no separate Release change or Install change screens anymore, and no DTAP stepper or environment dropdowns — everything lives in this one menu. Which items the menu shows depends on the change's status and on the environment.
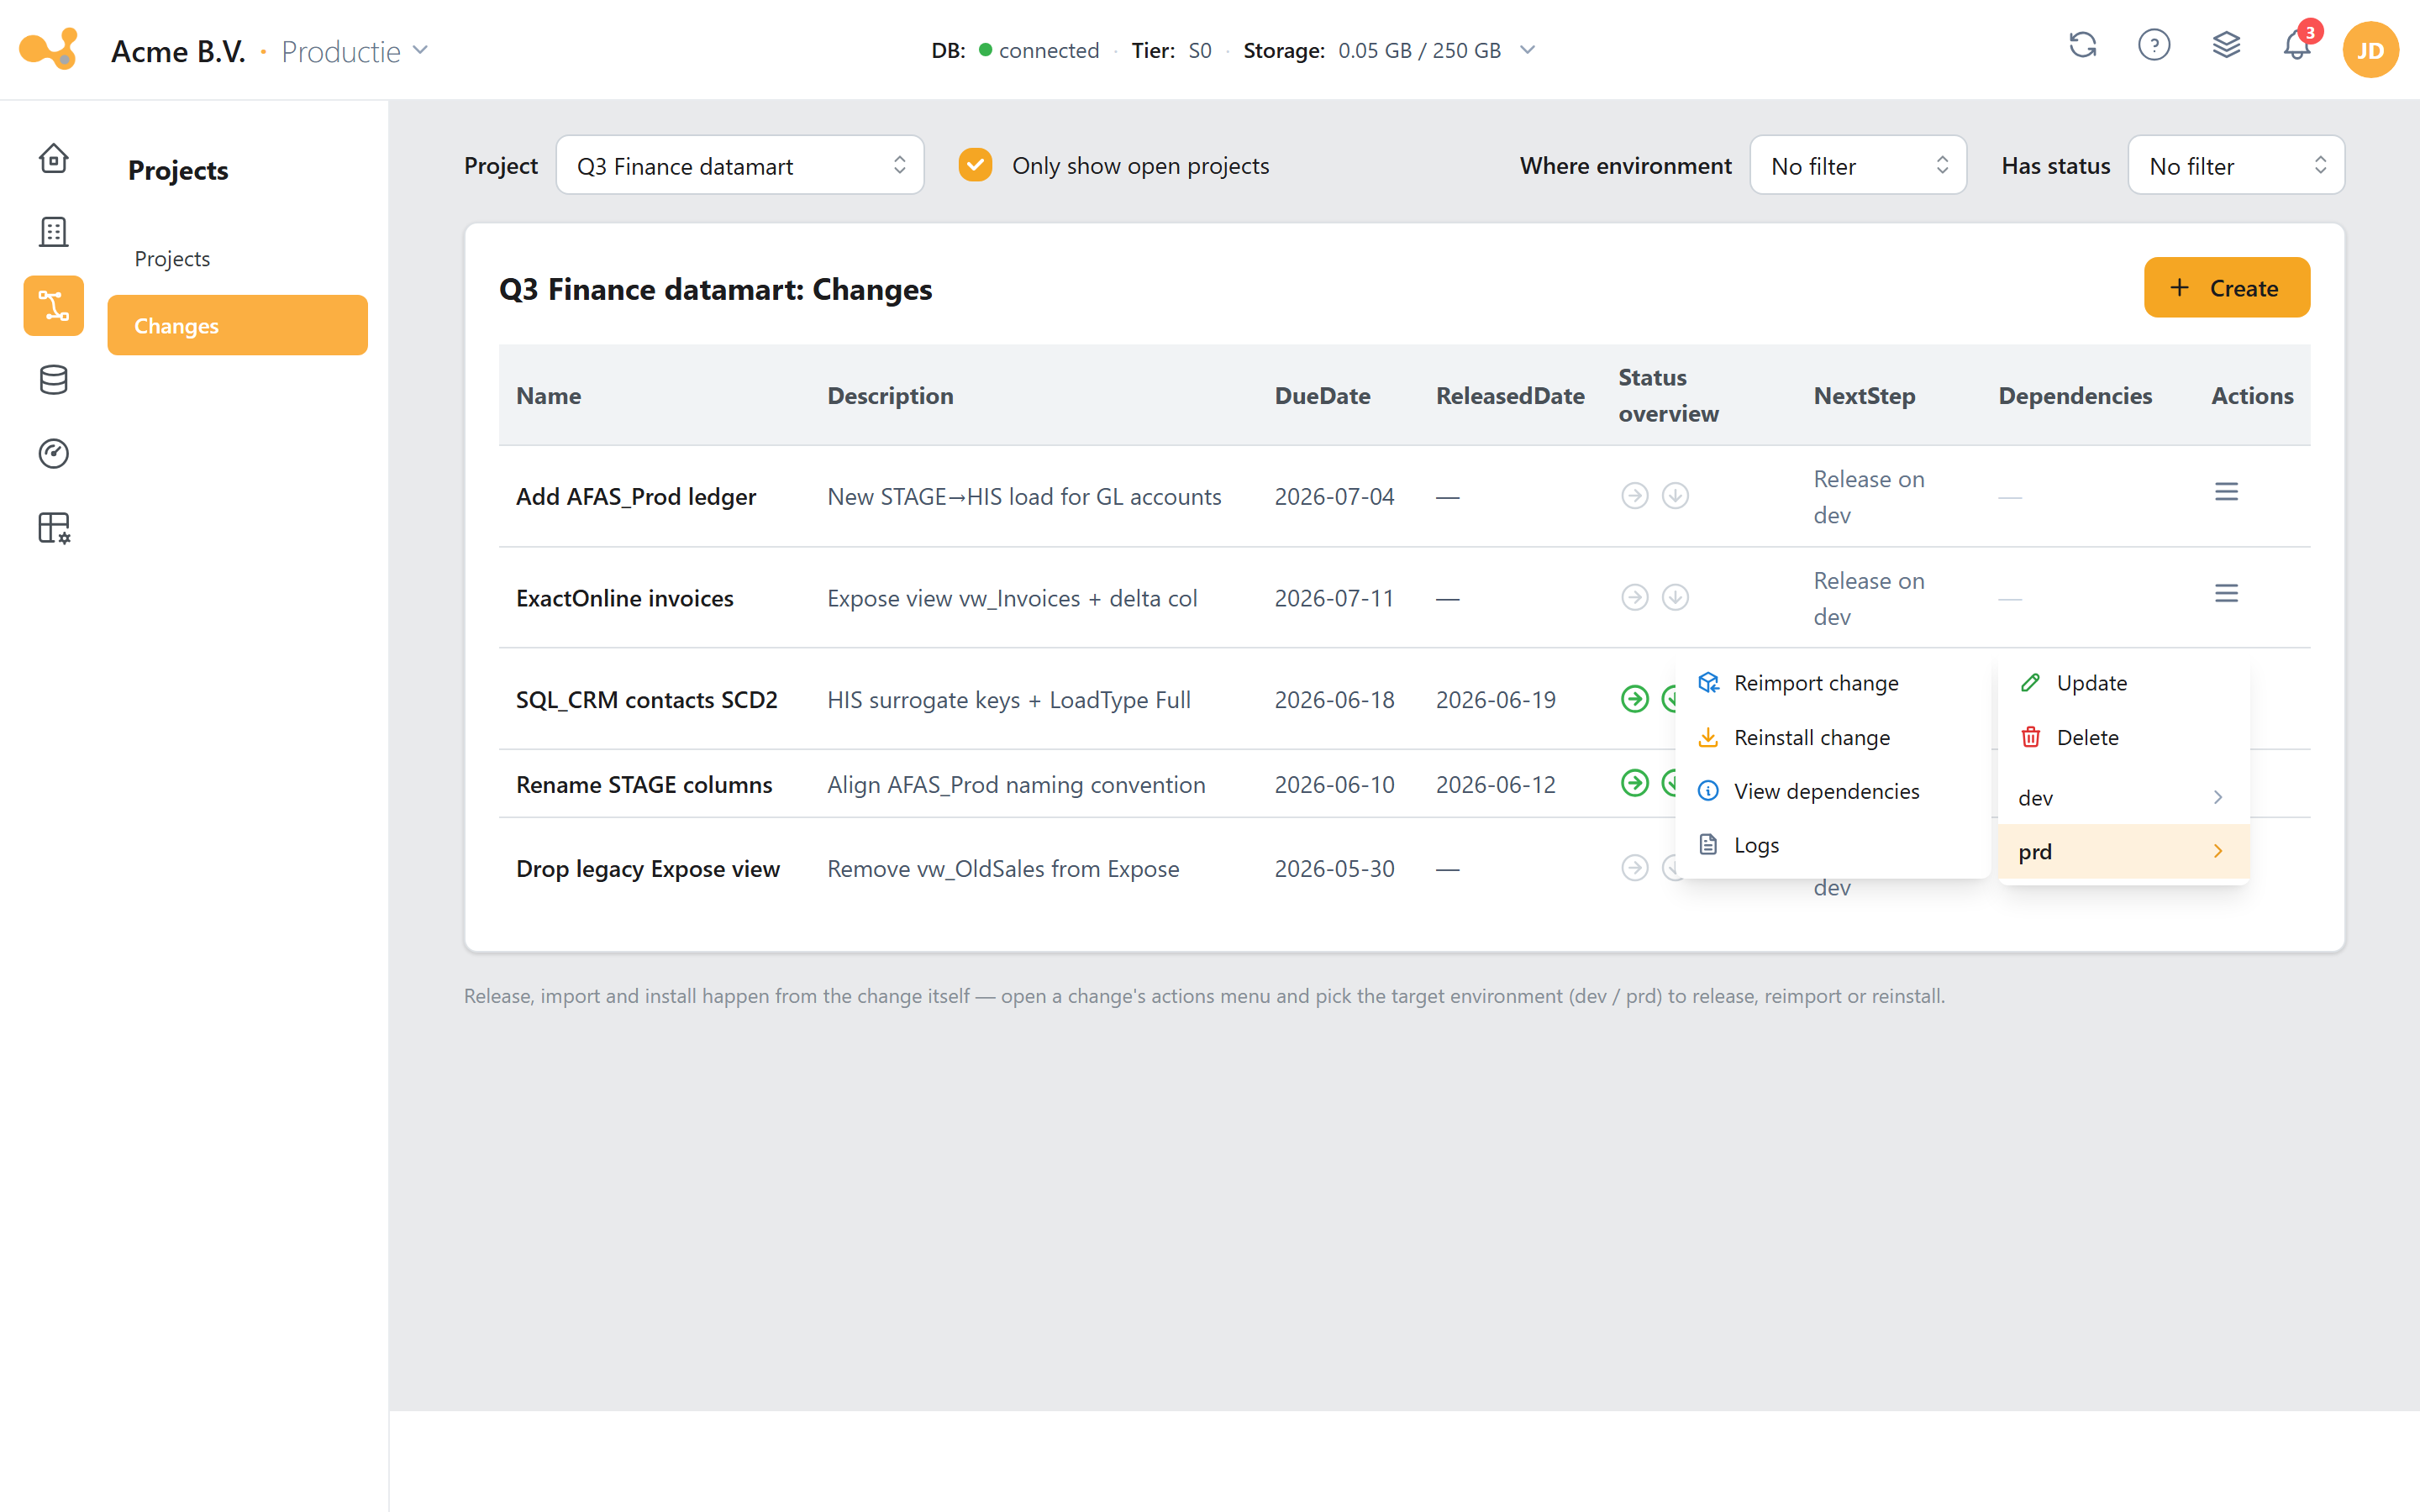
The menu contains:
- Update — edit the change (only meaningful while the change is open).
- Delete — delete the change.
- A per-environment submenu (e.g. dev ▸, prd ▸):
- On dev, an open change offers release change — this locks the change and makes it available to install (behind the scenes
[Change].[spRelease], with a dependency check). - On a target environment (e.g. prd), a released change offers Reimport change (DWH only,
[Change].[spImport]) and Reinstall change (DWH and ADF publish,[Change].[spInstall]+ thepublish-datafactorypipeline).
- On dev, an open change offers release change — this locks the change and makes it available to install (behind the scenes
- View dependencies — opens the dependency graph: which changes this one depends on and their status.
- Logs — opens the step-by-step import/install log (see Logs).
Releasing a change
Releasing makes a change available to be installed on another environment. You do this from the change's actions menu (☰), in the dev environment's submenu.
- Open the Changes sub-link and optionally filter on the project and environment.
- Review the content (see Viewing change content below).
- On the open change, open the actions menu (☰), go to dev ▸ and choose release change; confirm.
What happens:
- After releasing, the change can no longer be edited — the change is locked and ReleasedDate is filled in.
- Yres first runs a dependency check and blocks releasing if the change contains content that another change depends on; the error message names the dependent change(s).
- Behind the scenes, Yres runs
[Change].[spRelease]for the relevantChangeId.
Installing a change
Installing brings a released change to the next environment (e.g. dev → test, or test → prod). You also do this via the actions menu (☰), now in the target environment's submenu (e.g. prd ▸).
- Open the Changes sub-link and make sure the change is released (see the Status overview column and the NextStep suggestion, e.g. "Install on prd").
- On the change, open the actions menu (☰) and go to the target environment's submenu (e.g. prd ▸).
- Choose one of the two actions:
- Reimport change → calls
[Change].[spImport]: re-fetches the change and project data (including dependencies and content) in the target environment. This is DWH only and does not publish the ADF factory. - Reinstall change → imports and installs the change with
[Change].[spInstall]and publishes the ADF factory by running the Azure DevOps pipelinepublish-datafactory, so that new data-source pipelines land in the target factory as well.
- Reimport change → calls
- Follow the progress in the Logs (see below) and in the change's Status overview.
(Re)importing and (re)installing first check whether the DWH versions of the source and target environment match. If they differ, you get "Environment versions do not match, please update" and you must first update the environment via Update environments.
Viewing dependencies (dependency graph)
From the Dependencies column (the "N dependencies" link) or via View dependencies in the actions menu, you open the dependency graph. It shows which changes this one depends on and what their status is, so that before a release or install you can see whether the dependent changes are already present on the target environment.
Logs
Logs in the actions menu opens a step-by-step timeline of the import/install process, each step with a status and the origin. The steps run in this order:
- INIT
- ADD CHANGES
- ADD PROJECT
- ADD CHANGE CONTENT
- ADD CHANGE DEPENDENCIES
- END OF PROCESS
Viewing change content
Select a change to open the content panel; there you see the change's objects as a tree (source → schema → table → properties). Per object you read properties such as LoadType, DeltaColumn and ifExists. The "View as table" toggle switches between:
- As a tree — an expandable structure per source (source → schema → table); handy with many objects.
- View as table — per object the details in a table: the LoadType, the DeltaColumn for a delta load, and the ifExists behavior when the object already exists.
Since v1.53 you can choose to include dependencies and/or content when adding to a change, and you can include existing database objects directly from the object tree into a change.
Releasing, (re)importing and (re)installing all happen via the change's actions menu (☰) on the Changes screen: on dev an open change offers release change, on a target environment a released change offers Reimport change and Reinstall change. There are no separate Release change or Install change screens, no DTAP stepper and no environment dropdowns anymore.