Views, pipelines & triggers
This page is a task walkthrough: you'll learn how to create and materialize a persisted view, how to run pipelines manually, how to schedule triggers and how to tie individual steps together into a master pipeline.
Looking for the complete field-by-field explanation per screen? You'll find it in the frontend reference: Data Engineering → View persistence and Load Management (Run pipelines, Triggers, Master pipelines). This page summarizes how you do it; those pages describe every field of the screen.
Creating and materializing a persisted view
A persisted (materialized) view stores the result of a database view in a real table, so that reports read directly from a table instead of recomputing a (possibly slow) view every time.
Prerequisite: a view must already exist in the database. Yres materializes that view; it does not create it for you. Create the view, for example, with SQL Server Management Studio (SSMS) — think of a view DM.Vw760 in the IRIS_DWH database.
You manage persisted views in the webapp under Data engineering → View persistence (/dataengineering/viewpersistence). The screen reads from the view Loadmanagement.vwViewPersistence.
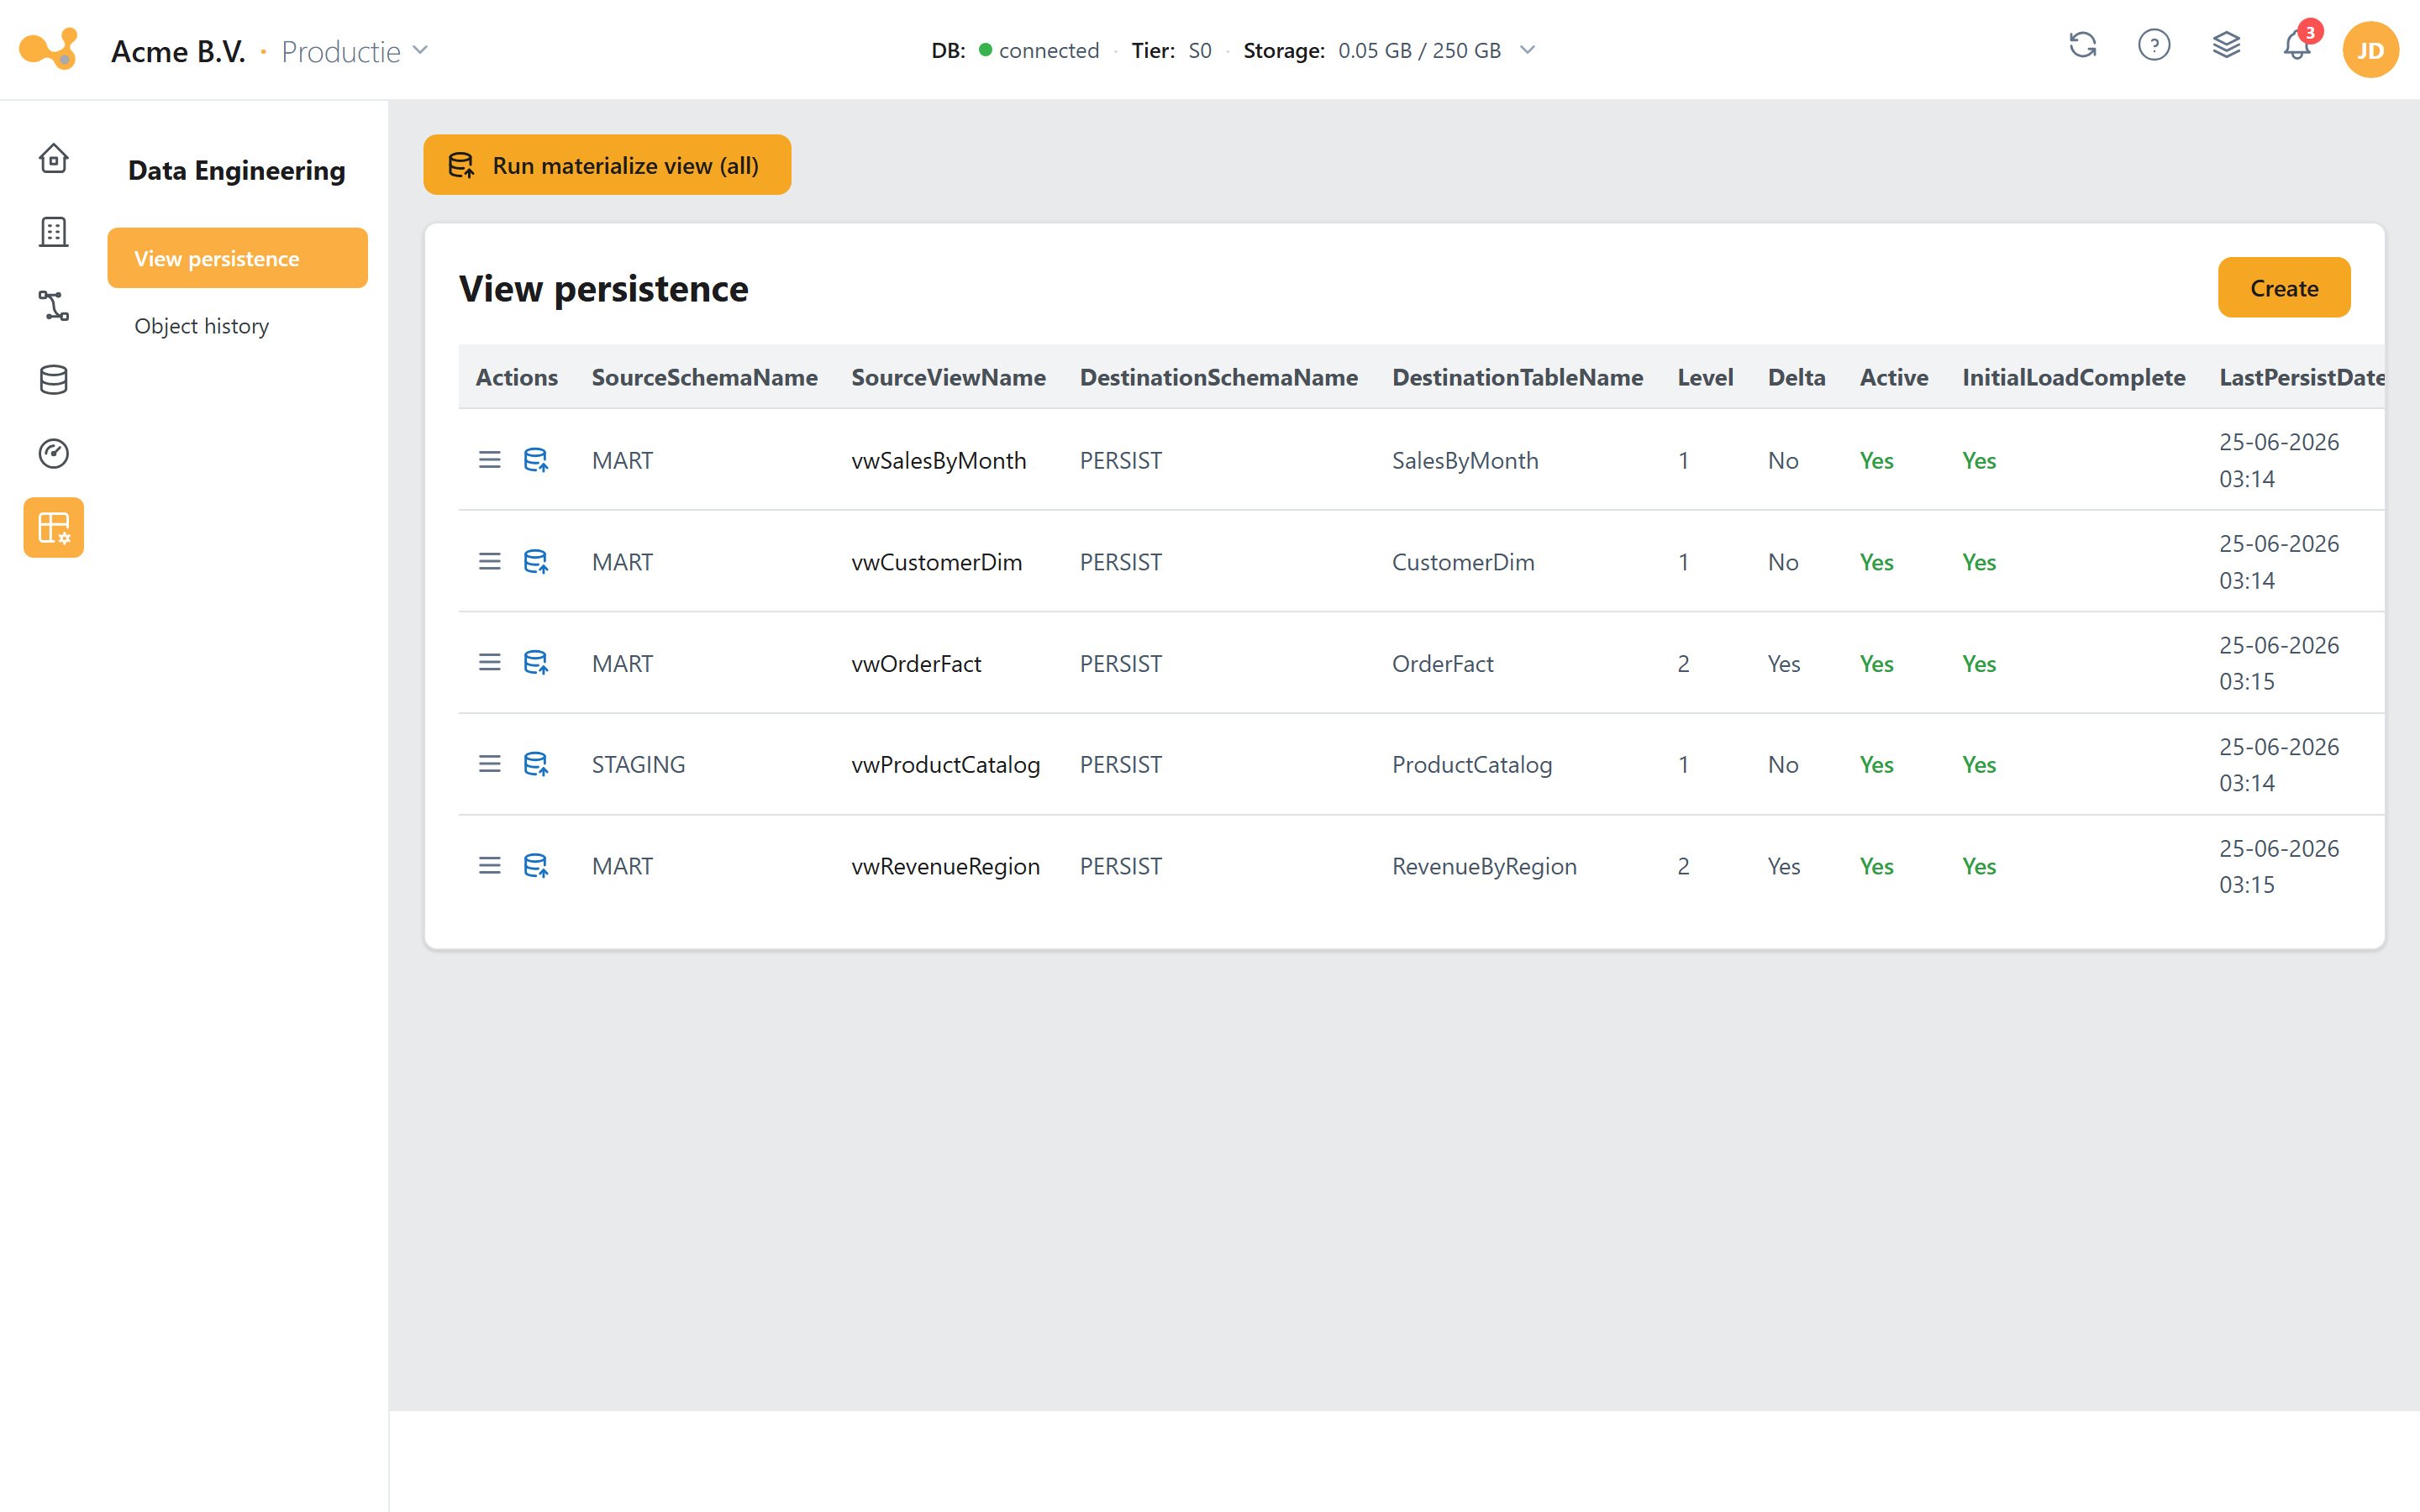
The View persistence screen: the persistence table with the creation form (Create persisted view) below it.
(1) Run materialize view (all) — button at the top right; runs the Materialize View pipeline for every row in the table.
(2) Persistence table — one row per persisted view with SourceSchemaName, SourceViewName, DestinationSchemaName, DestinationTableName, Level, Delta, LastPersistDate and Active.
(3) Run materialize view (per row) — row action that fills in the Materialize View pipeline parameters Schema/Table and opens the ad-hoc runner.
(4) Create persisted view form — choose the source view and the destination schema/table here.
(5) Level + load type — determines the materialization order and whether the view is refreshed in full (Full) or incrementally (Delta).
Steps
- Open Data engineering → View persistence. Click + Add persisted view (or edit an existing row).
- Choose the source:
SourceSchemaName+SourceViewName. You pick from DWH views that are not yet persisted; the view appears under its schema name in the Create persisted view dialog. - Choose the destination:
DestinationSchemaName+DestinationTableName(both alphanumeric, max. 128 characters) — the table in which the result is stored. - Set the Level (integer ≥ 0). The Level determines the order of materialization: if view B depends on view A, give A a lower Level than B so that A is ready first. For independent views the Level doesn't matter.
- Choose the load type:
- Full — the entire view is materialized to the destination table again on every run.
- Delta — only changed records. In that case choose the source delta object type (
View (V)orTable (T)), the corresponding schema/name, and the DeltaColumn that tracks the changes.
- Save. The screen registers the view-to-table configuration via
MaintainPersistView. - Materialize straight away with Run materialize view (per row, callout 3) or Run materialize view (all) (callout 1).
The actual materialization is performed by the stored procedure [LoadManagement].[spMaterializeViews], called by the Materialize View pipeline. That same step (Materialize Views) also runs automatically at the end of the standard load workflow, so persisted views stay current after every load. The Delta mode relies on the same change tracking as the rest of Yres — see History & SCD2.
Running pipelines manually
You start pipelines in Load Management → Run pipelines (/loadmanagement/runPipelines). The pipeline list is on the left, the runs of the selected pipeline on the right with filters by period and status.
Steps:
- Open Load Management → Run pipelines and select a pipeline on the left.
- Click Start pipeline. If the pipeline has parameters, the button reads Set parameters to start and a form opens.
- Fill in the parameters and confirm. The run appears in the runs table.
Two common cases:
- Refresh All Metadata — select the metadata pipeline on the left and click Start pipeline. This refreshes the source metadata (schemas, tables, columns) before you add tables.
- Dynamic Workflow YRES — this is the dynamic load workflow. Fill in: Source, Source schema and Source table, and optionally choose a Running tier (the tier the load runs on) and a Revert-to tier (the tier Yres scales back to afterwards). On older Yres versions this pipeline is still called
Dynamic Workflow IRIS; the app recognizes both names.
The actual loading happens in Azure Data Factory: the pipeline copies the source into STAGE and then calls [LoadManagement].[spLoadDWH]; progress is logged via [Monitoring].[spWriteLoadStatus]. You can stop a running run via the stop icon. See Data flow for the full flow.
Scheduling triggers
With a trigger you let a pipeline run automatically on a fixed interval. You manage triggers in Load Management → Triggers (/loadmanagement/triggers).
Steps:
- Open Triggers and select the pipeline you want a trigger for on the left.
- Click Create.
- Fill in:
- Name (required).
- Every / interval (a number) and Frequency:
Minute(s),Hour(s),Day(s),Week(s)orMonth(s). - For Week(s): a Day of the week. For Month(s): a Day of the month (1–31). For Day/Week/Month: a Time.
- If the pipeline has parameters (such as the Dynamic Workflow with Source/Schema/Table), fill those in in the second step.
- Click Submit. The trigger is created in ADF and started immediately; you can start, stop or delete it later from the triggers table.
The interface shows the hint "Timezone UTC(+1) will be used", but the trigger actually uses the time zone of the logged-in user (from your user settings), not a fixed UTC+1. Keep this in mind when scheduling.
Setting up a master pipeline
With master pipelines you tie existing Yres building blocks together into a single flow with conditional logic — for example deltas during the week and a full reload at the weekend, or a Power BI refresh that only runs after a successful load. You work in a visual editor (based on reactflow) under Load Management → Design master pipeline.
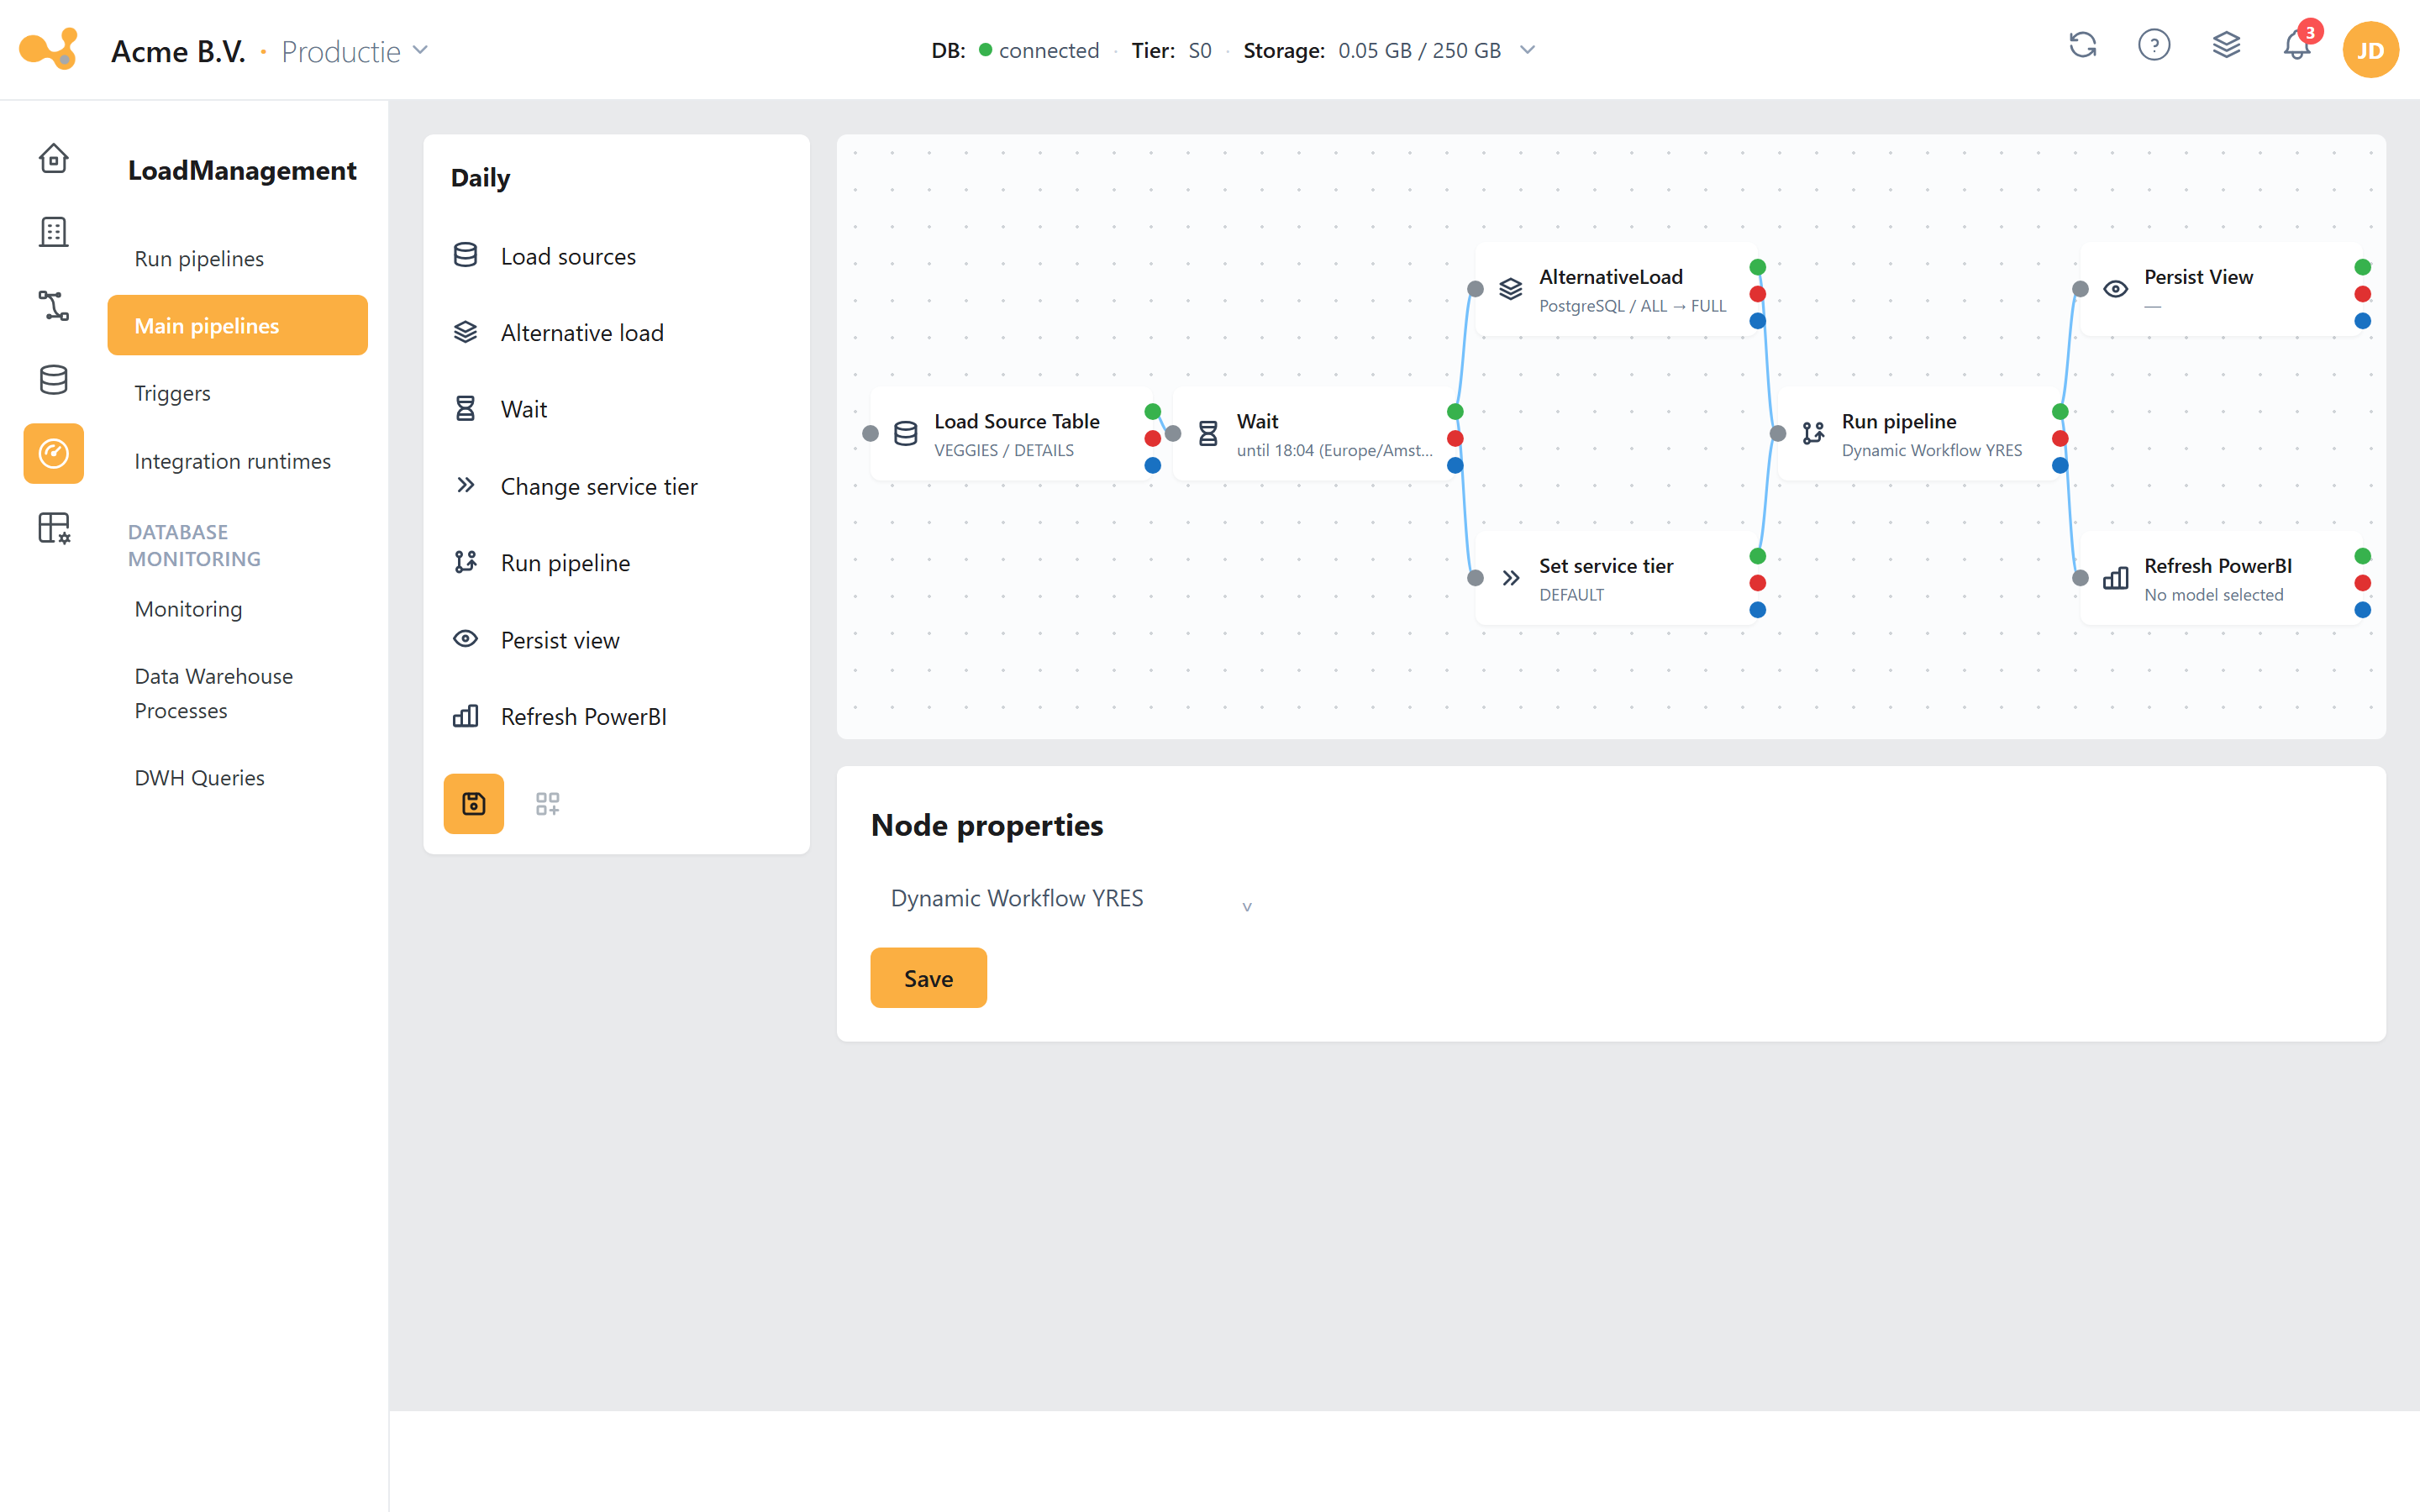
The Design master pipeline screen: drag node types onto the canvas, connect their outputs and publish the flow to ADF.
(1) Node palette on the left — drag a node type onto the canvas. (2) Canvas (reactflow) — connect nodes, select them to configure, delete with Backspace. (3) Three outputs on the right of each node: On success (green), On failure (red) and On completion (blue) — you build the conditional logic with these. (4) Input on the left of a node — connections come in here. (5) Color legend for the three outputs. (6) Save (draft) and Publish (to ADF; only active after a Save).
Steps:
- Open Load Management → Design master pipeline and create a new flow.
- Drag node types from the palette (callout 1) onto the canvas. Available nodes include Load sources, Alternative load, Wait, Change service tier, Run pipeline, Persist view and Refresh PowerBI.
- Connect the nodes by dragging from an output on the right of a node to the input on the left of another node. Deliberately choose On success (green), On failure (red) or On completion (blue) to define your logic.
- Select a node to configure it (for example, with Load sources the source/schema/table).
- Click Save to store the draft.
- Click Publish to generate the flow as an ADF pipeline. The published pipeline appears in the Data Factory (folder
MasterPipelines) and in Run pipelines after a few minutes.
A master pipeline lets you tie existing Yres building blocks (loads, waits, tier switches, view materialization, Power BI refresh) together with success/failure/completion logic. You don't draw individual copy activities or data transformations: you configure nodes and their connections, and Yres generates the underlying ADF pipeline from them. The full list of node types and their points of attention is in Load Management → Master pipelines.
Further reading
- Data Engineering — full field-by-field explanation of View persistence and Object history.
- Load Management — Run pipelines, Triggers, Monitoring and Master pipelines per screen.
- Data flow — where the Materialize Views step and the Dynamic Workflow fall within the overall load workflow.
- History & SCD2 — background on the
Deltamode of persisted views.