Connect & load a data source
Adding a source in Yres is not a matter of writing a pipeline: you fill in a wizard, and Yres generates the corresponding Azure Data Factory (ADF) linked service and pipelines in the background. This page walks through the four steps you go through afterwards:
- Connect a source — the Create source wizard (incl. waiting for publication to ADF).
- Refresh metadata — run the
GetMetaDatapipeline so Yres knows the schemas, tables and columns. - Add tables — use the Add table wizard to choose which source tables get loaded.
- Configure a load — set the load type, key columns and delta columns.
Yres supports, among others, SQL Server, Azure SQL, Oracle, DB2, PostgreSQL, MySQL, Snowflake, SharePoint, Power BI, AFAS, Exact Online, Salesforce, SAP and generic OData/REST services. The exact connection fields, authentication and any integration runtime differ per type — see data source requirements.
1. Connect a source
You always create a source in the dev environment; via the Changes flow you promote it to test/prod later. The Create source button therefore only appears on dev.
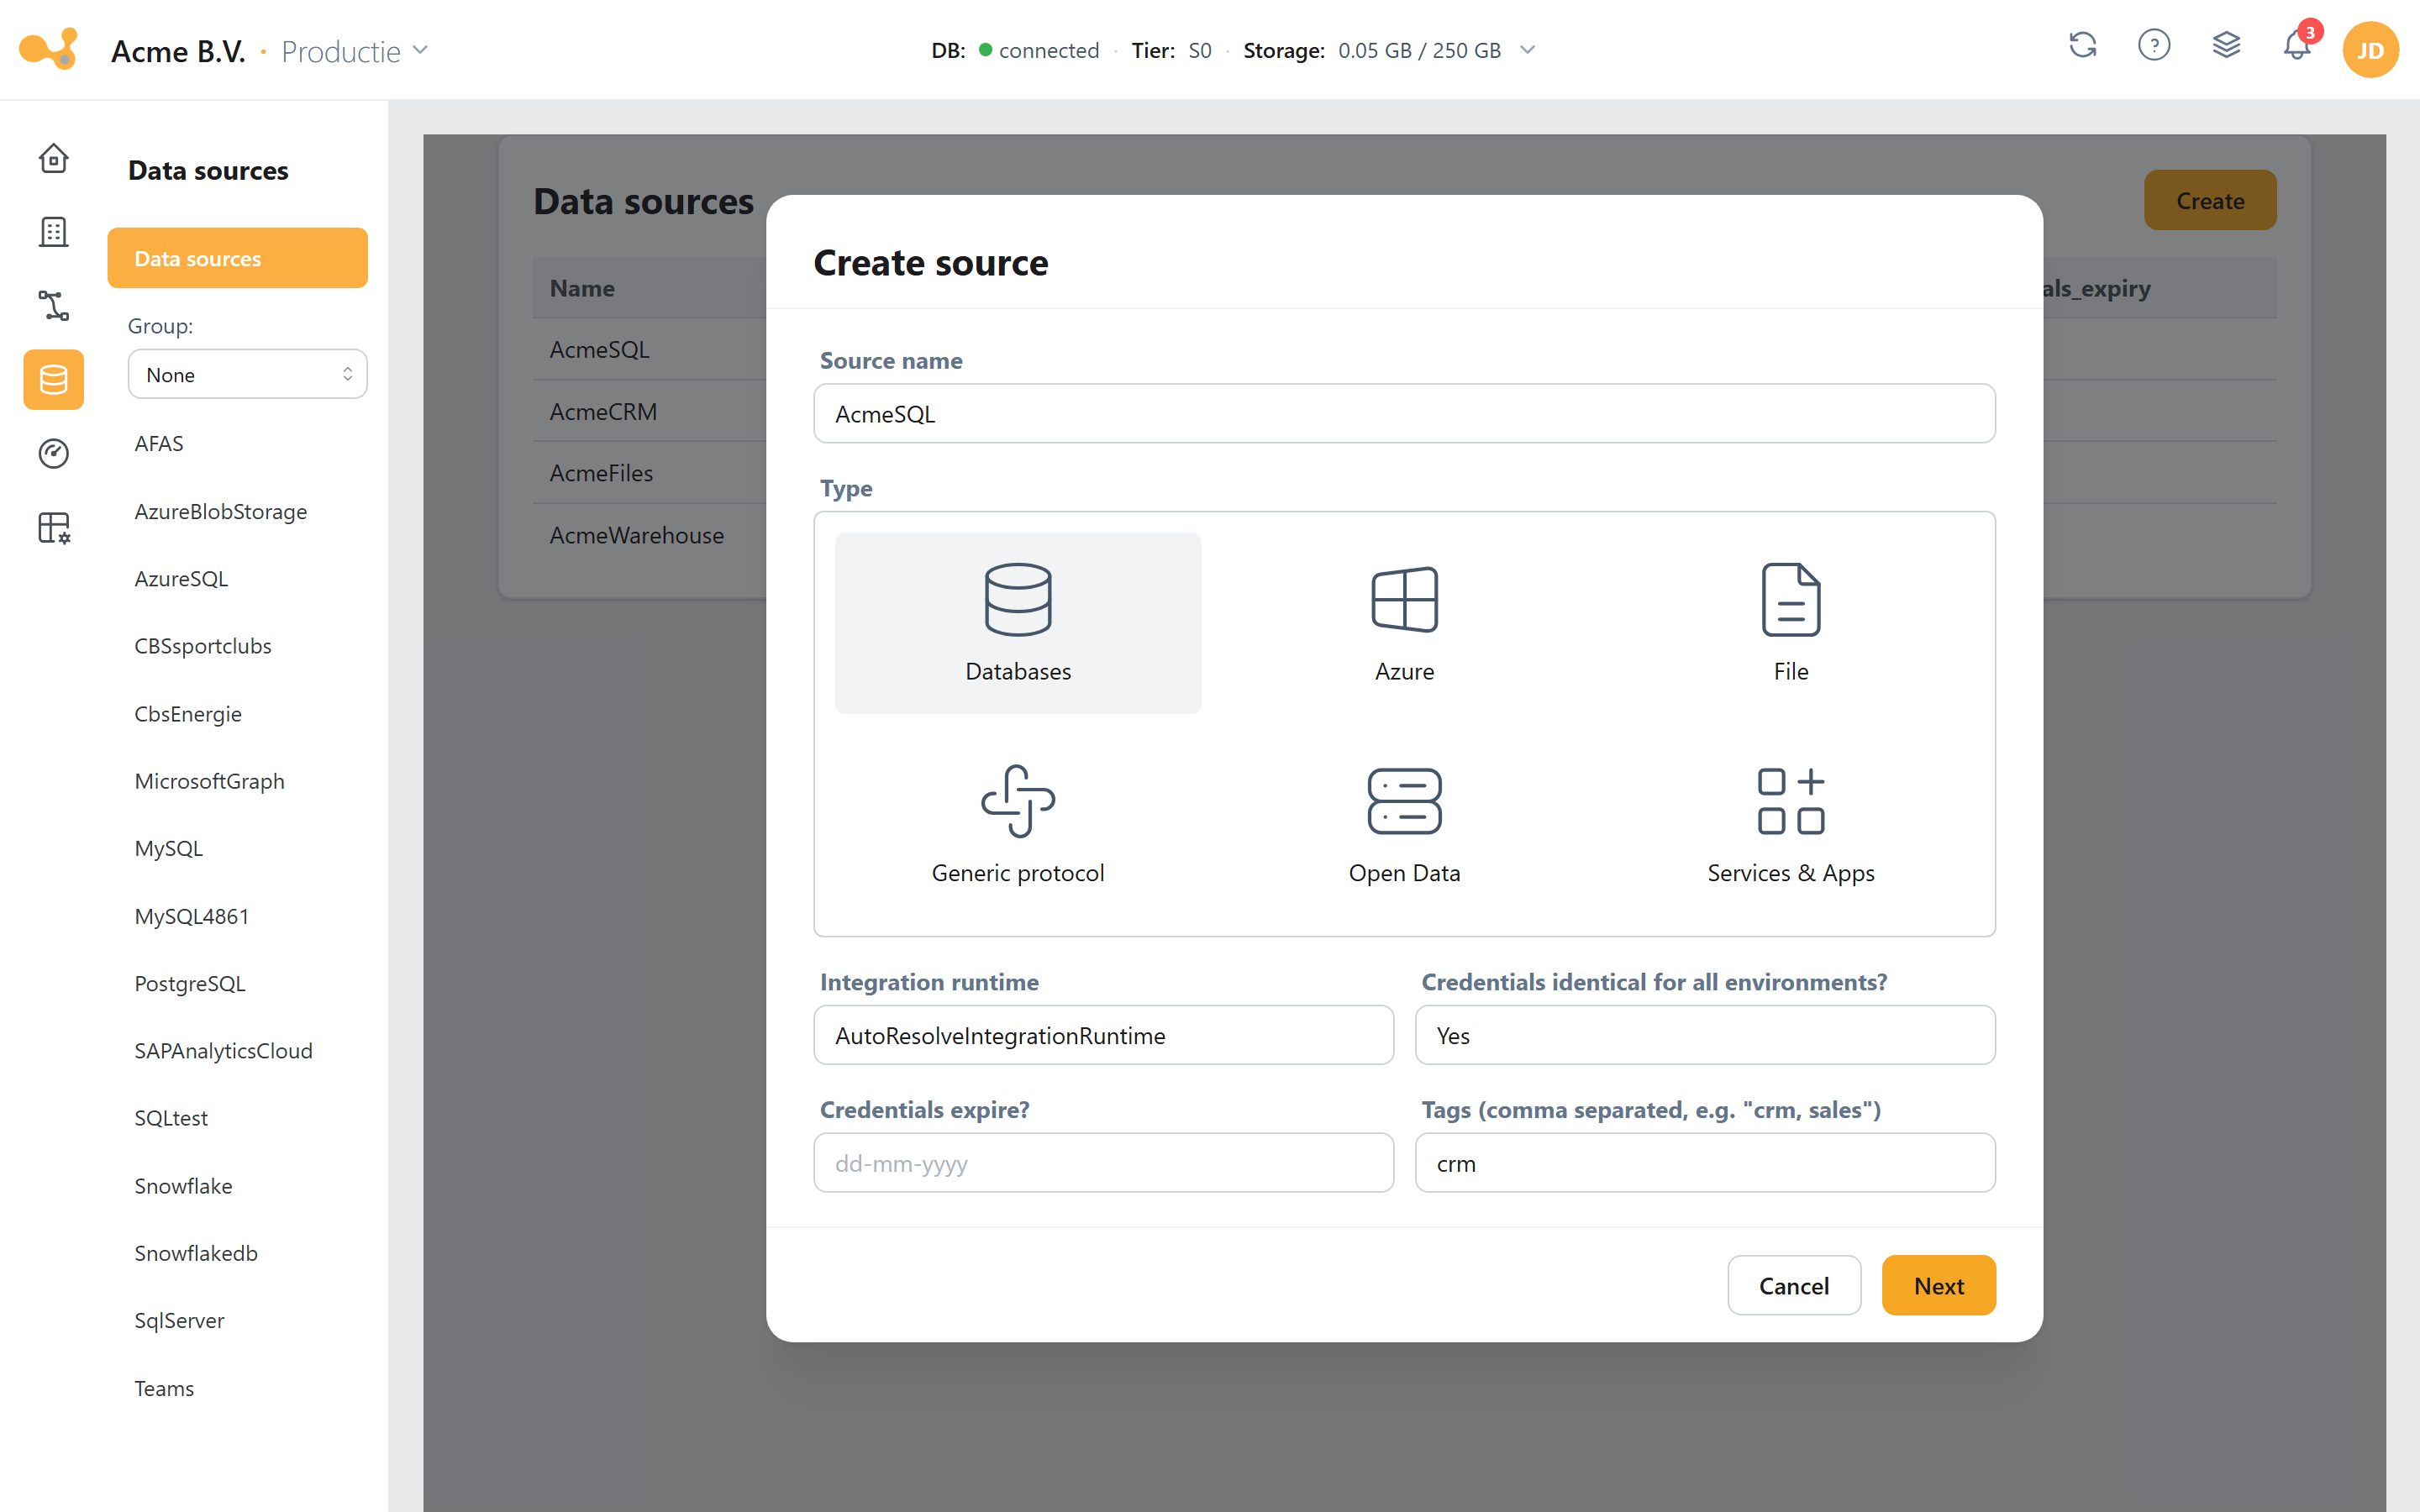
Step 1 of the Create source wizard: first define the source (name, type, runtime), then enter the credentials per environment.
(1) Source name — unique per organization, starts with a letter, alphanumeric, 2–45 characters. This name also becomes the name of the ADF linked service and the Key Vault secret group adf-{name}-….
(2) type — the source picker (databases, apps, generic protocols). Your choice determines which credential fields you see in step 2.
(3) integration runtime — defaults to AutoResolveIntegrationRuntime (the cloud runtime). Choose a self-hosted IR for on-premises or shielded sources (required for File Server and local files).
(4) Credentials identical for all environments? — Yes lets you enter the credentials once and reuse them for prod; No adds a per-environment entry step. For Exact Online this is fixed to No (a separate app per environment).
(5) Step 2 (Credentials) — the source-specific fields (for example host, database name, port, user name, password for SQL sources), per environment.
(6) Next — moves to the credentials; the final step submits the request (POST /data-source).
Steps
- Open a source in the Data sources section and click Create source (only visible on dev).
- Fill in step 1: Source name, type, integration runtime, Credentials identical for all environments?, optionally an expiry date (credentials expire?) and Tags.
- Click Next and enter the credentials — a single form if the credentials are identical, otherwise one per environment.
- Click Submit. Yres stores no passwords or secrets in its own database; those go straight to the customer's Azure Key Vault. The linked service only references those secrets.
Waiting for publication to ADF
After Submit, a progress message appears instead of an immediate result. That is because creating a source runs asynchronously: the backend runs a task chain CreateDataSourceInADF → SetDataSourceCredentials → CreateDataSourceInDataWarehouse. The first step adds the linked service and the pipeline GetMetaData - <source> to the factory, but publishing to ADF takes a moment.
While publication is running, the Used tables page shows the message "source not published" — the GetMetaData - <source> pipeline does not exist yet at that point. Wait until the progress message has finished before you refresh metadata or add tables. If a step fails, Yres automatically rolls back the entire source (from the DWH, from ADF and from its own database).
2. Refresh metadata
Before you can add tables, Yres needs to know which schemas, tables and columns the source has. That is the job of the pipeline GetMetaData - <source>: it reads out the metadata and fills the dictionary tables (LoadManagement.Dictionary / LoadManagement.vwInitialDictionary), which the Add table wizard then reads.
Steps
- Open the source and go to Used tables. A card shows the latest run and status of
GetMetaData - <source>; via the link icon you jump to the ADF monitoring. - Click Refresh metadata.
- Confirm in the dialog (
"Run GetMetaData - <source>"). The run starts; refresh the page if the status is still In progress.
For file sources (such as File Server or local files) and REST API sources there is no metadata refresh. They lead to a dedicated flow (Used files / Used REST service) instead of the table wizard.
3. Add tables (the Add table wizard)
On Data sources › (source) › Used tables you see which source tables are already being loaded (read from LoadManagement.vwUsedTables). Per row you can view columns, run an ad-hoc load and — as of v1.54 — activate/deactivate a table without deleting its definition or history.
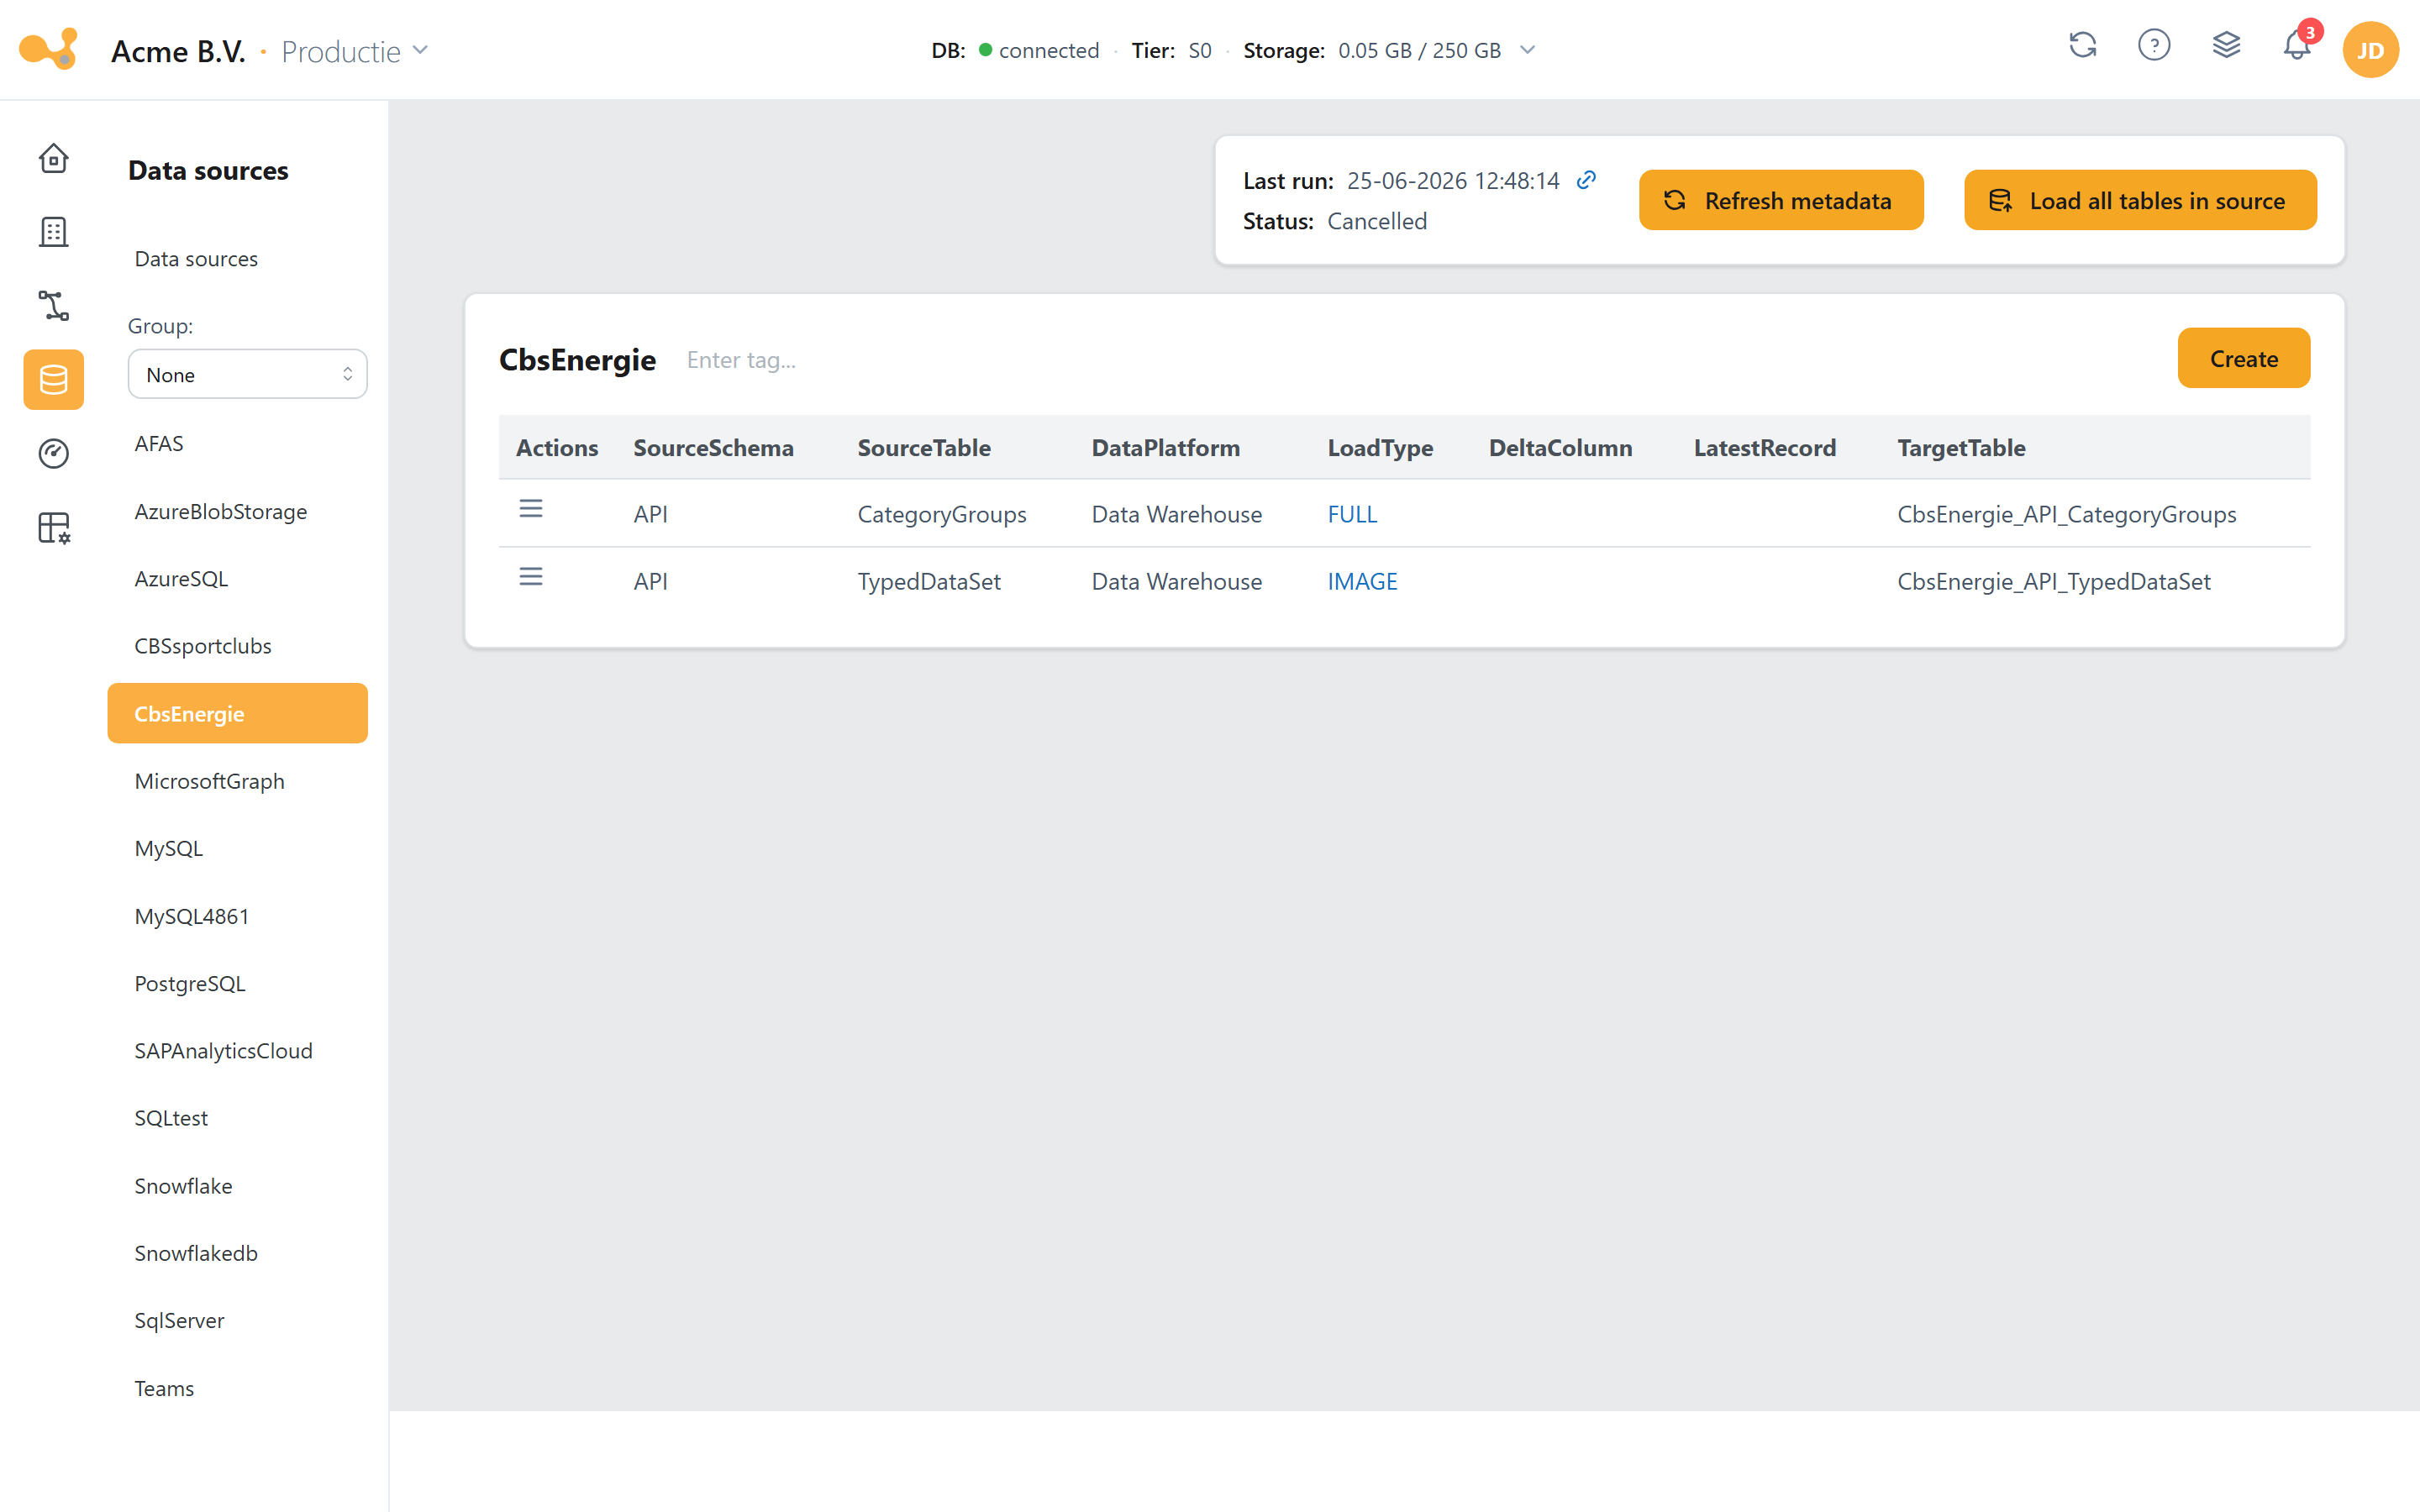
The Used tables page: at the top the metadata pipeline card, below it the loaded tables with their load type, delta column and target table.
(1) Metadata pipeline card — latest run, status and ADF link of GetMetaData - <source>.
(2) Action buttons — Refresh metadata rescans the source; Load data (all) runs Dynamic Workflow YRES for all tables.
(3) Card title — the source name with its associated tag chips.
(4) Tables grid — from LoadManagement.vwUsedTables: SourceSchema, SourceTable, LoadType, DeltaColumn, LatestRecord and TargetTable.
(5) Row actions — column info, load data, activate/deactivate and (where applicable) a warning that the source metadata has drifted.
(6) Deactivated table — rows with active = 0 are shown greyed out and skipped during a load.
On dev the page blocks editing tables if there is no open Change, and then links to Projects & Changes. For an organization with a single environment this step is skipped; the change is then automatically booked under ChangeId 1.
The seven wizard steps
Click Add table to add a new source table. The wizard runs through seven steps in a fixed order:
Project → Schema/table → Columns → Load type → Key column → Options → Overwrite
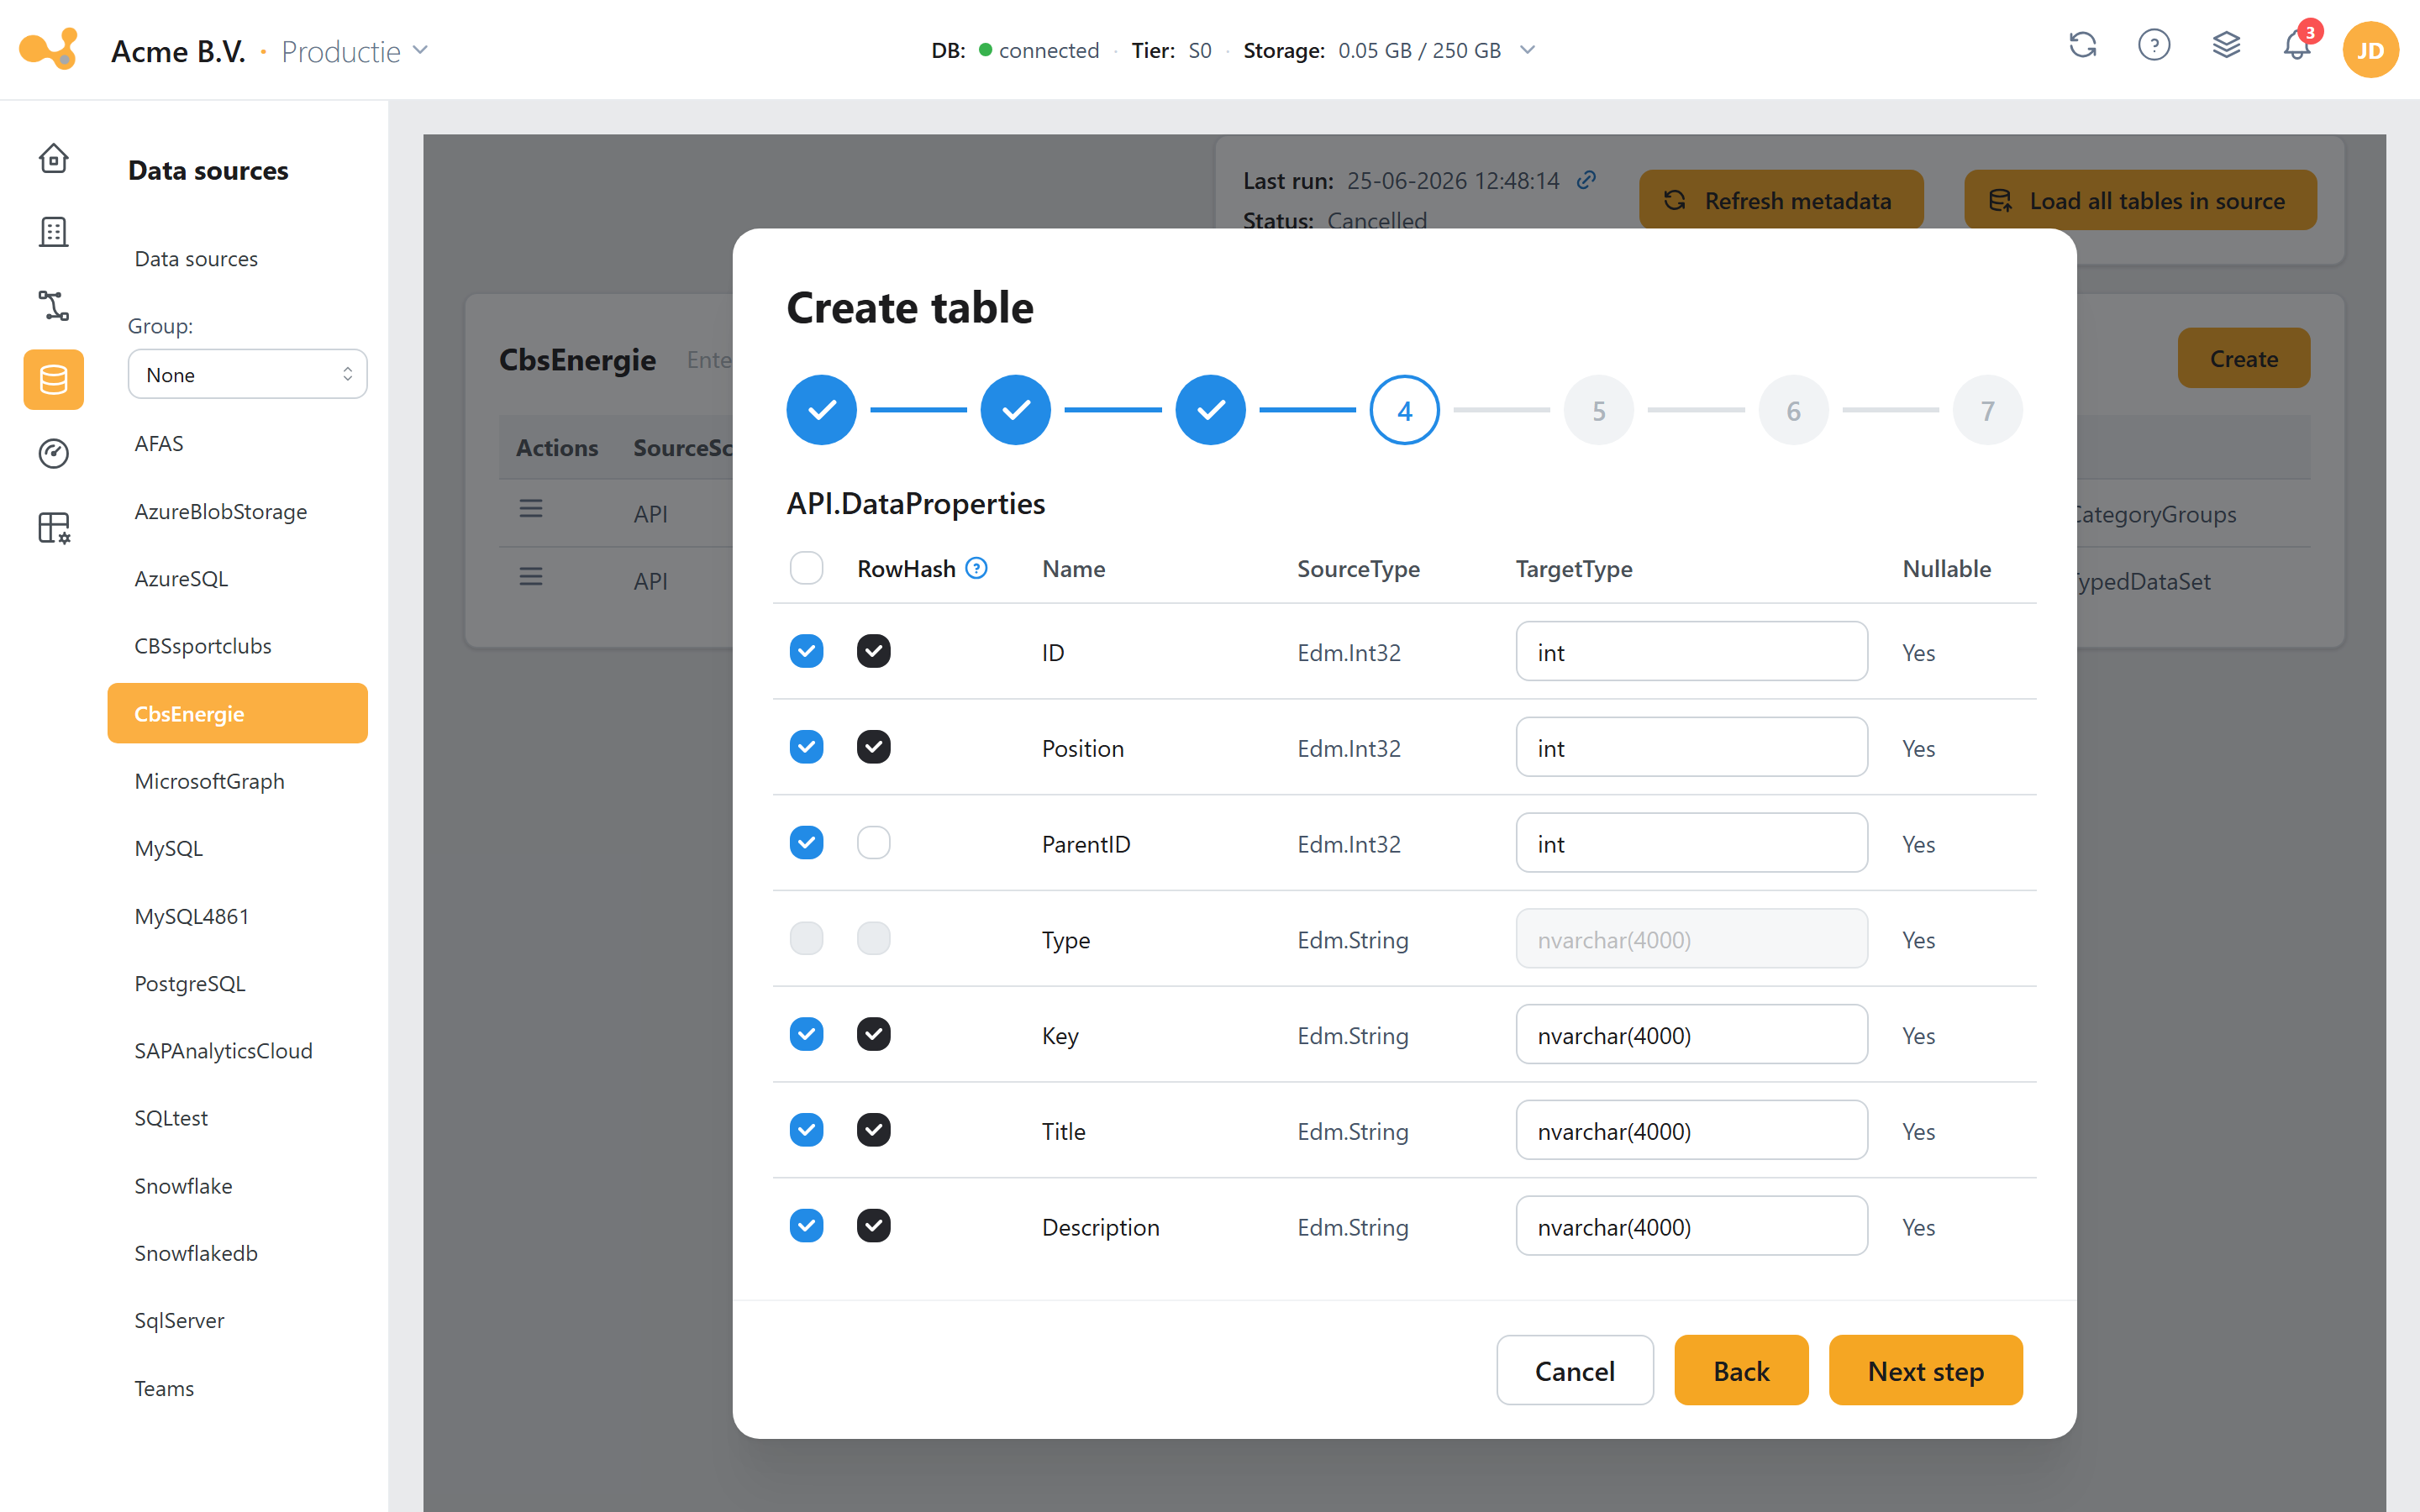
The Add table wizard, opened on the Columns step. Load type and key columns follow in the steps after.
(1) Step bar — the seven steps; you are now on Columns.
(2) Selected source table — the schema/table you chose in step 2.
(3) Tick columns — choose which columns you want to load (at least one); "select all" ticks everything.
(4) RowHash column — columns with RowHash ticked count towards the SCD2 change detection (v1.54+). Reserved names (keyhash, rowhash, etl_date, etl_enddate, iscurrent, delta) are blocked.
(5) Override TargetType — adjust the target type or size per column (for example varchar(100), decimal(18,2)).
(6) Back / Next — navigate through the steps; Next leads to Load type, Key column, Options and Overwrite.
Step by step:
- Project and change — choose an open Project and Change (skipped for a single environment). When deleting, the wizard shows only this step.
- Schema / table / dataplatform — choose a schema and table from the not-yet-used tables, plus at least one DataPlatform: Data Warehouse and/or Azure Datalake. When editing, schema and table are read-only.
- Columns — tick columns, set the RowHash participation per column (v1.54+) and optionally override the TargetType.
- Load type & delta columns — see configure a load.
- Key column — see configure a load.
- Options — extra options depending on the service tier and source type (for example memory-optimized tables, package size, delta overlap). If there are none, you can skip the step.
- Overwrite — optionally override the physical STAGE/HIS target names. A live preview shows the result, for example
[STAGE].[SOURCE_SCHEMA_TABLE]and[ODS].[…].
The wizard in pictures
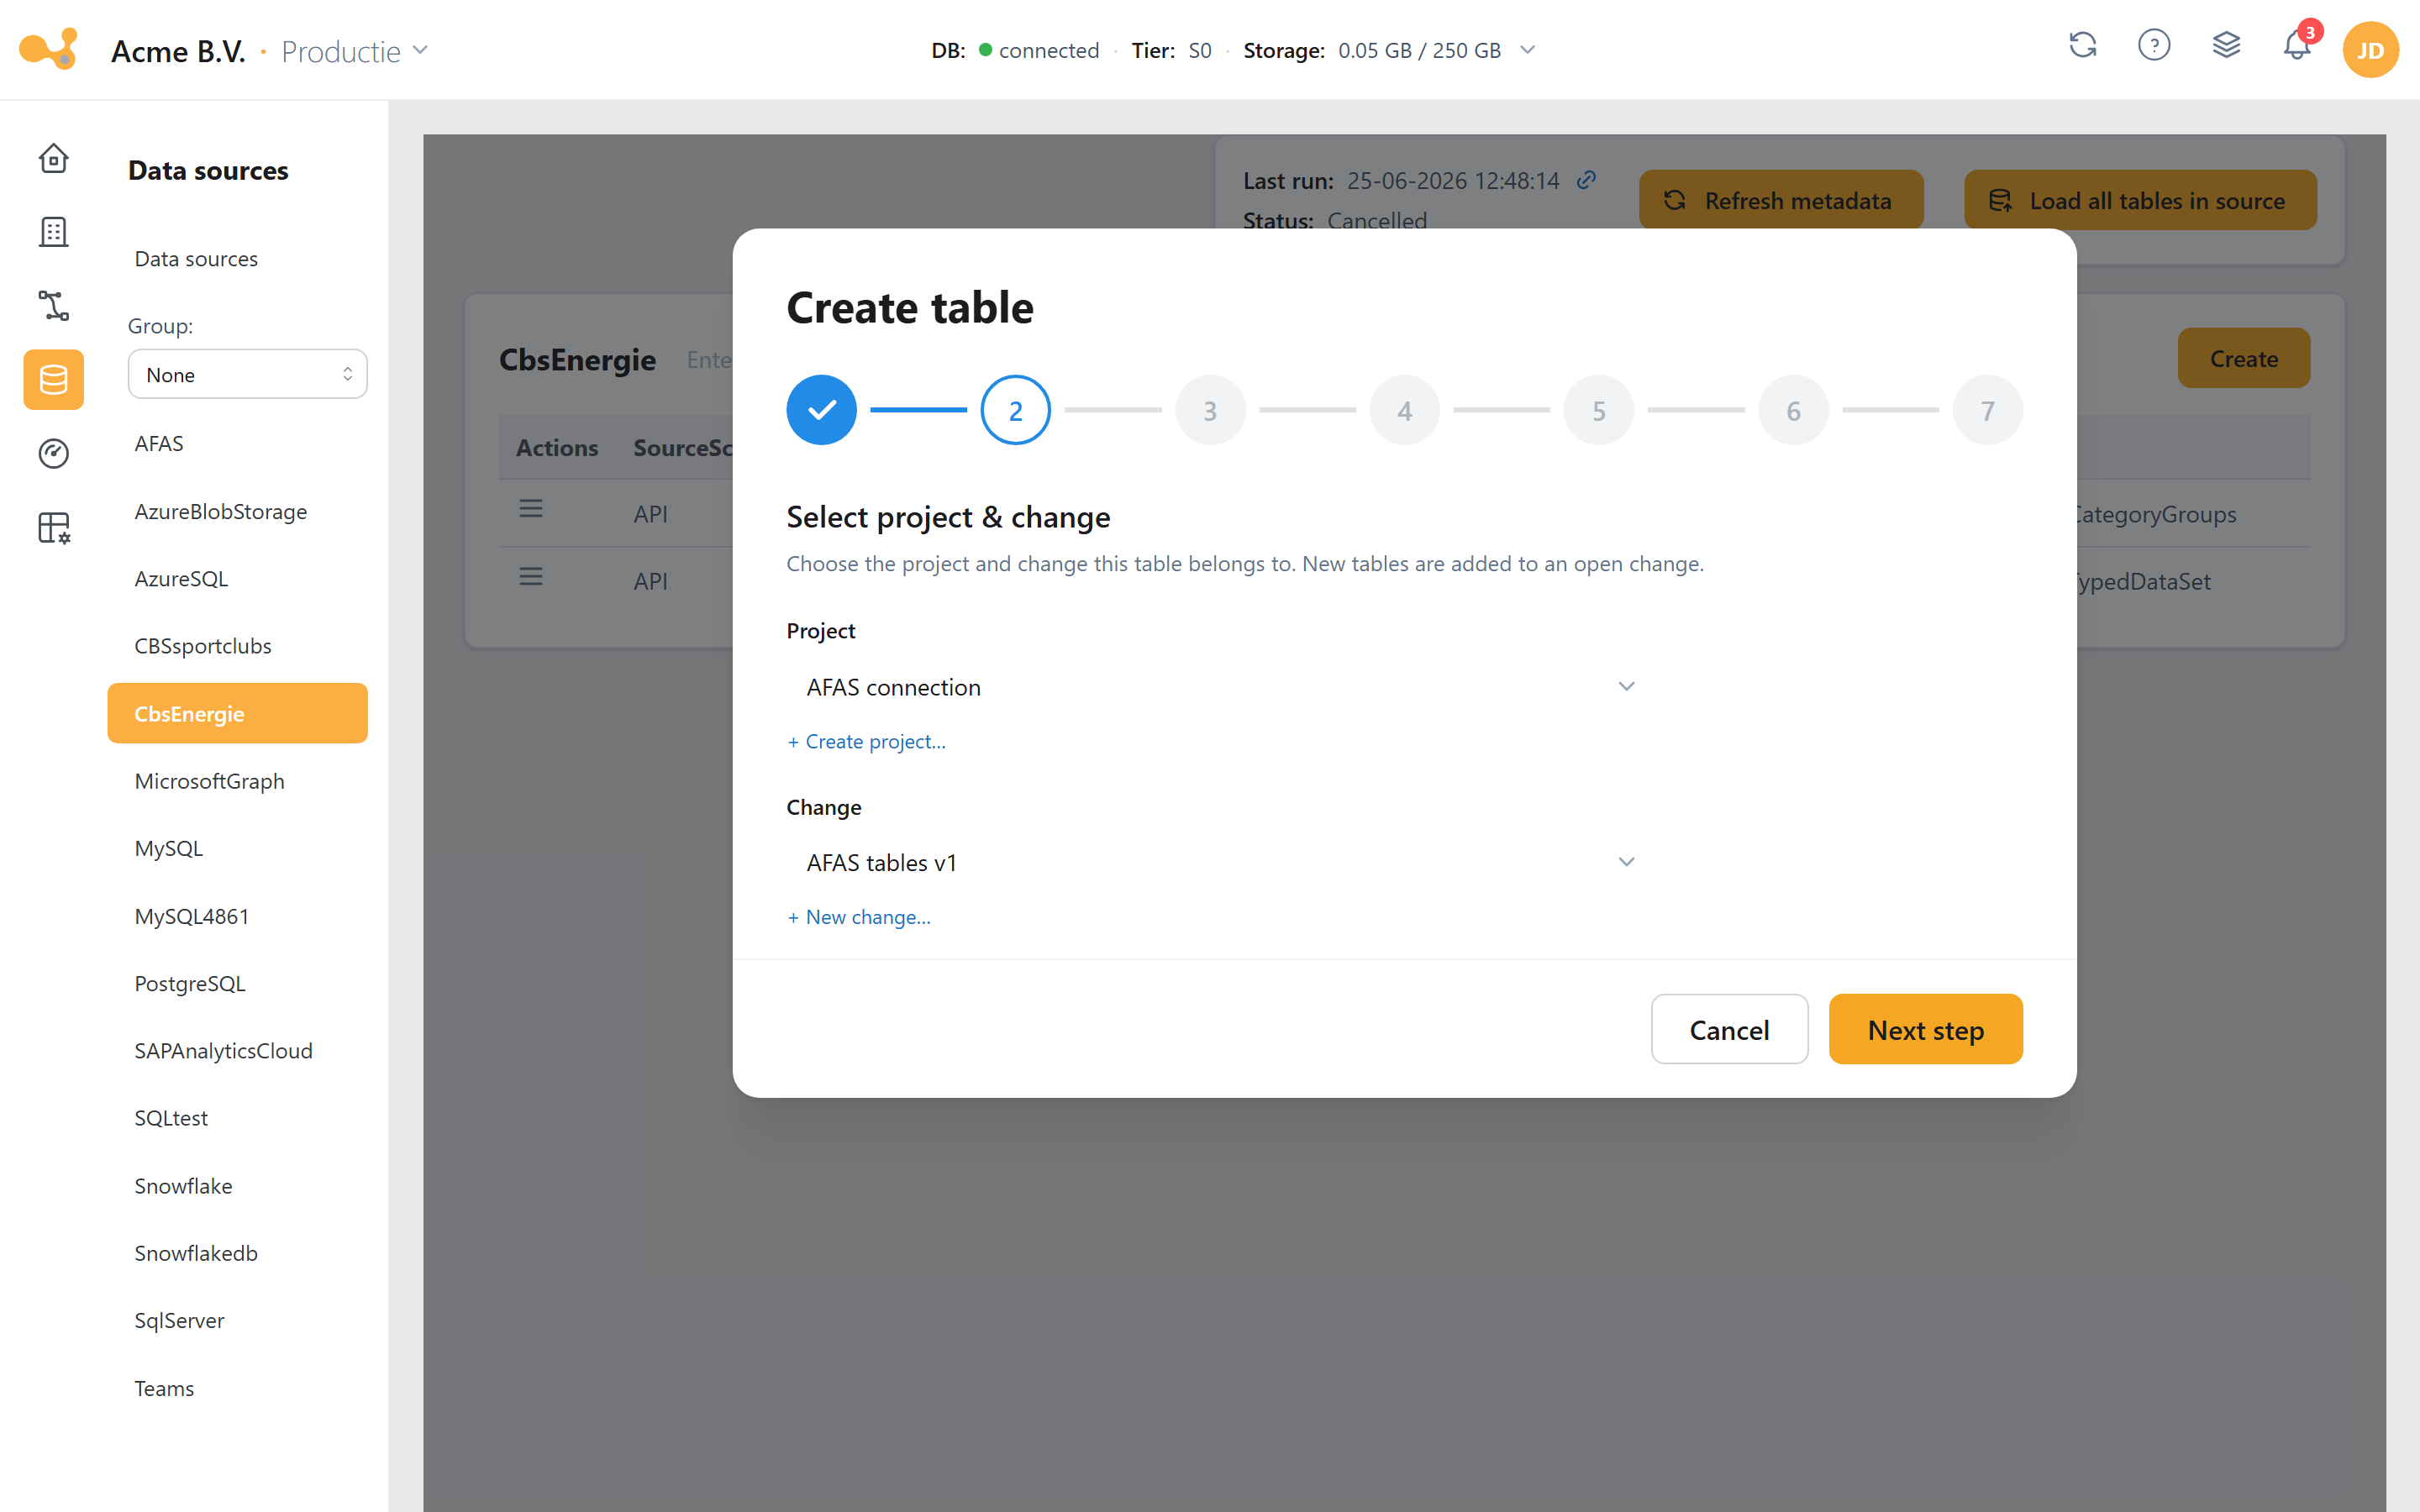 Project & Change — everything you add is booked under the chosen Change (skipped for a single environment).
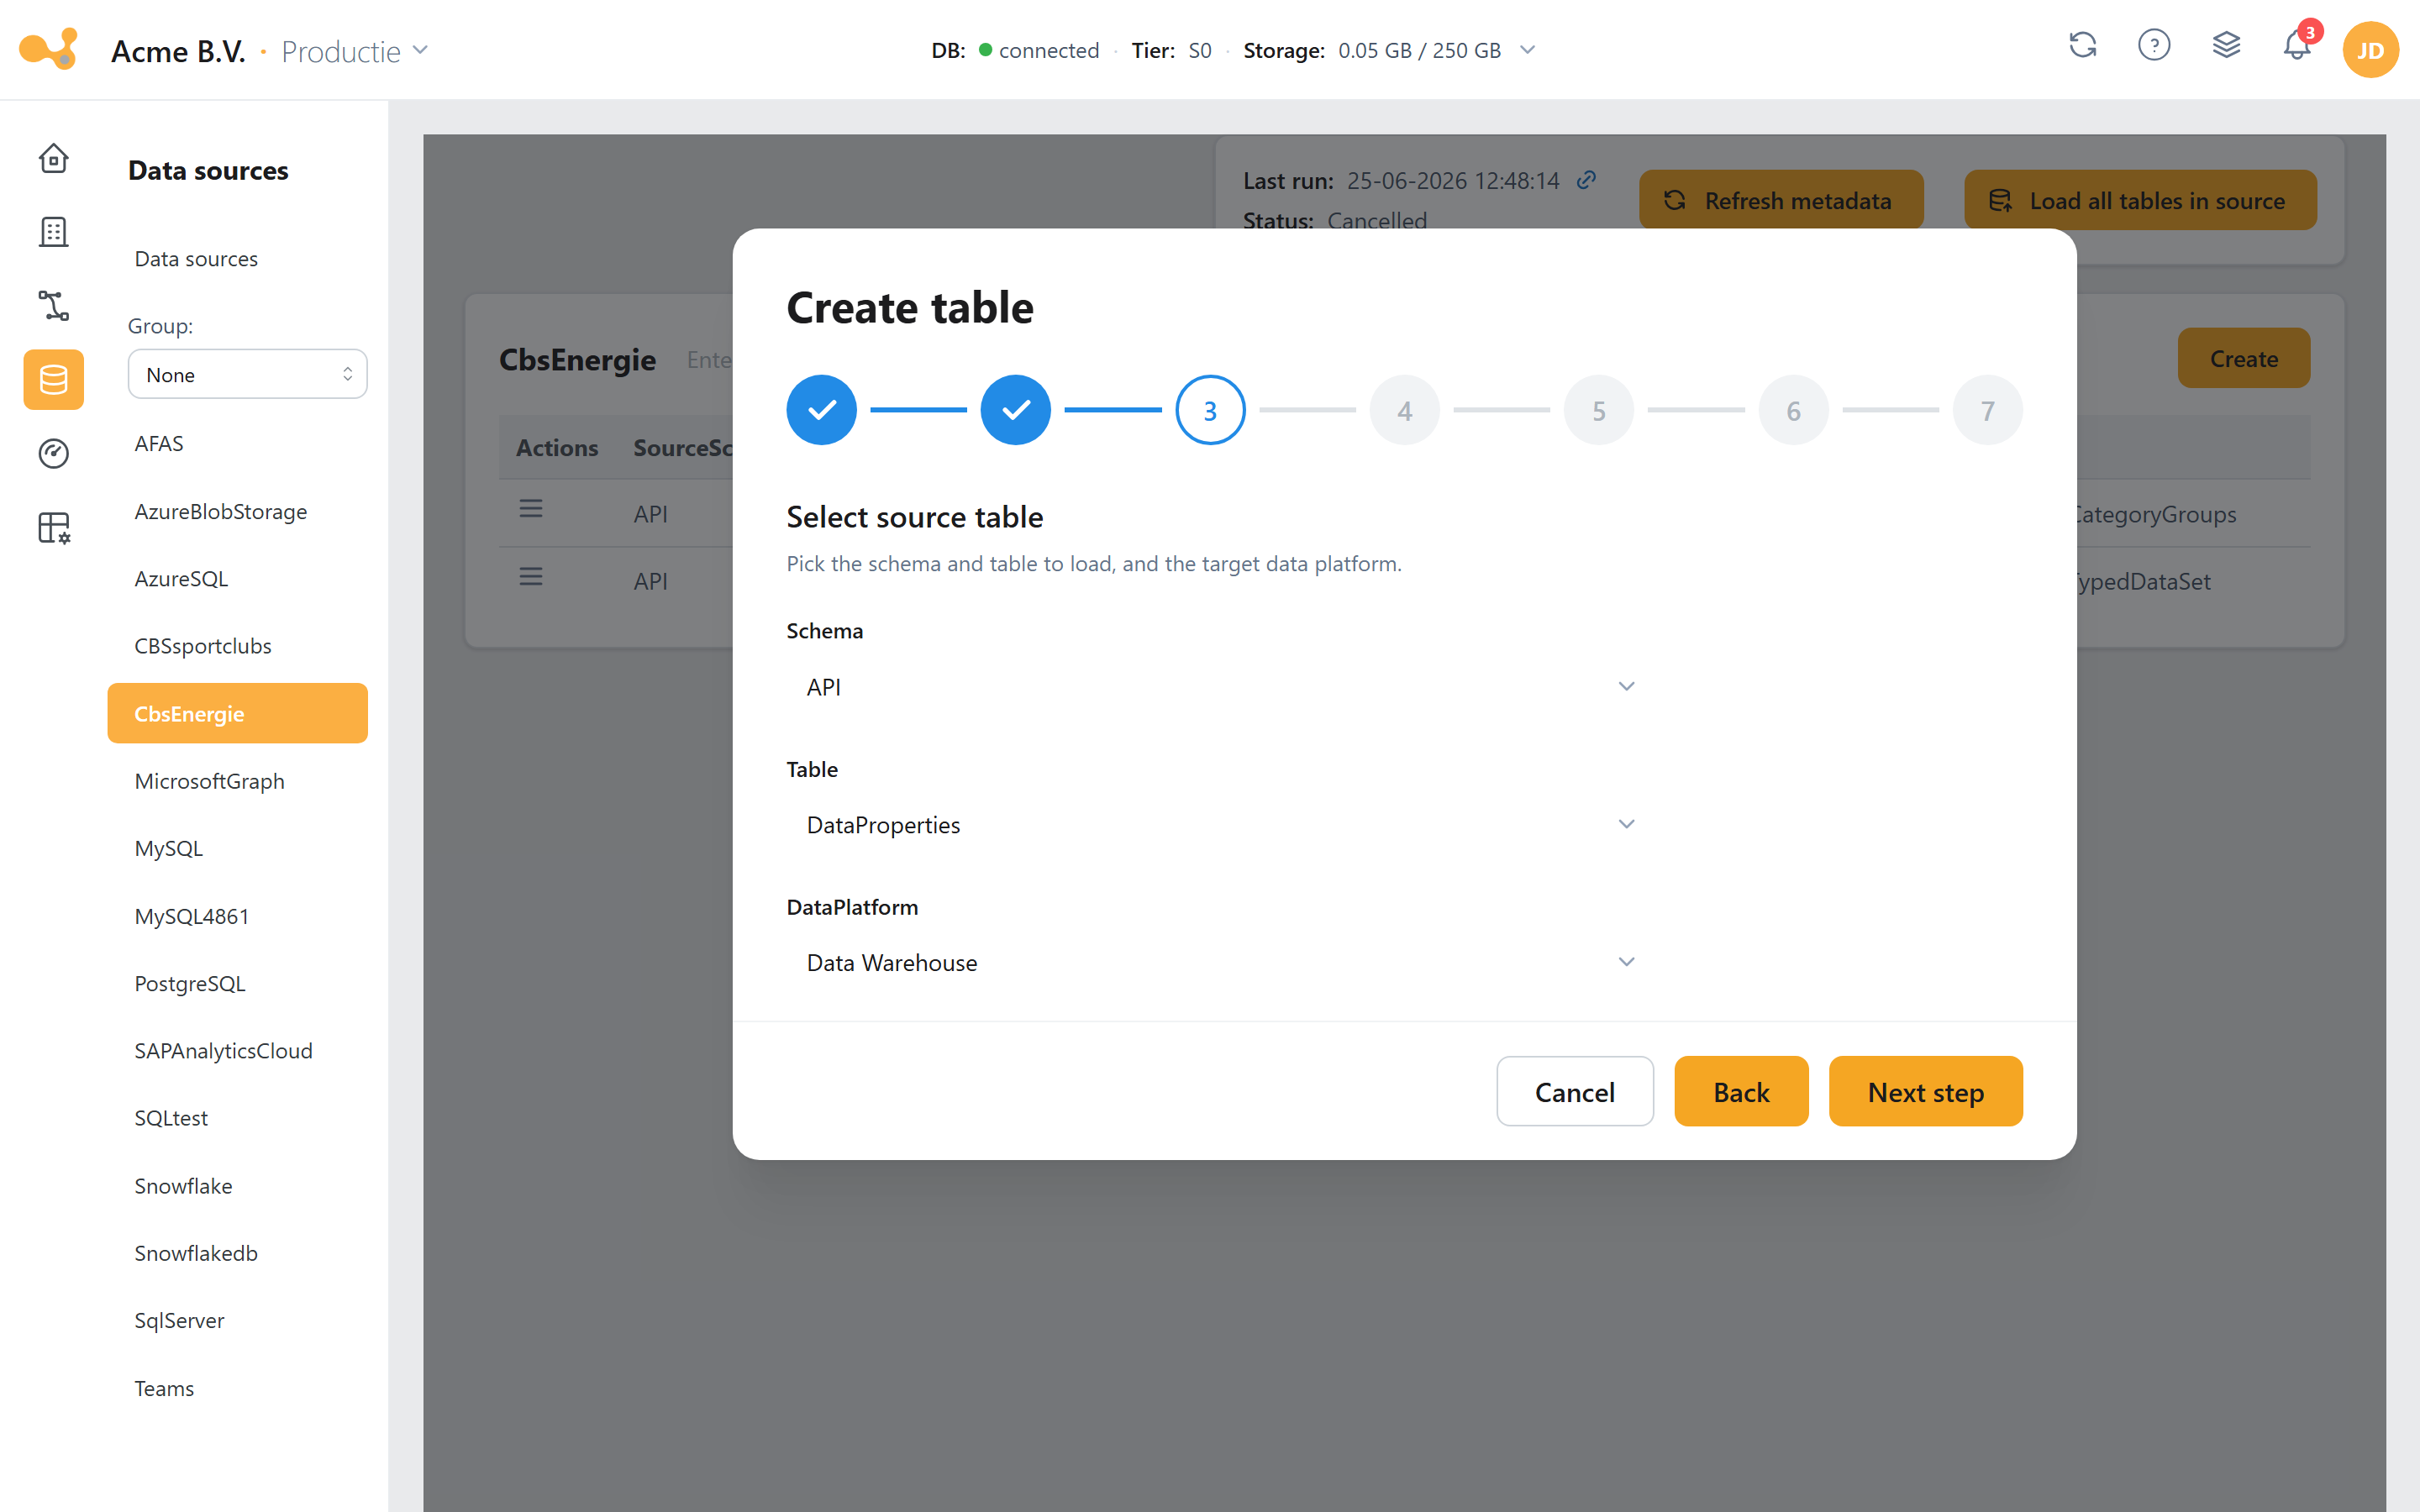 Schema, table & dataplatform — Data Warehouse and/or Azure Datalake.
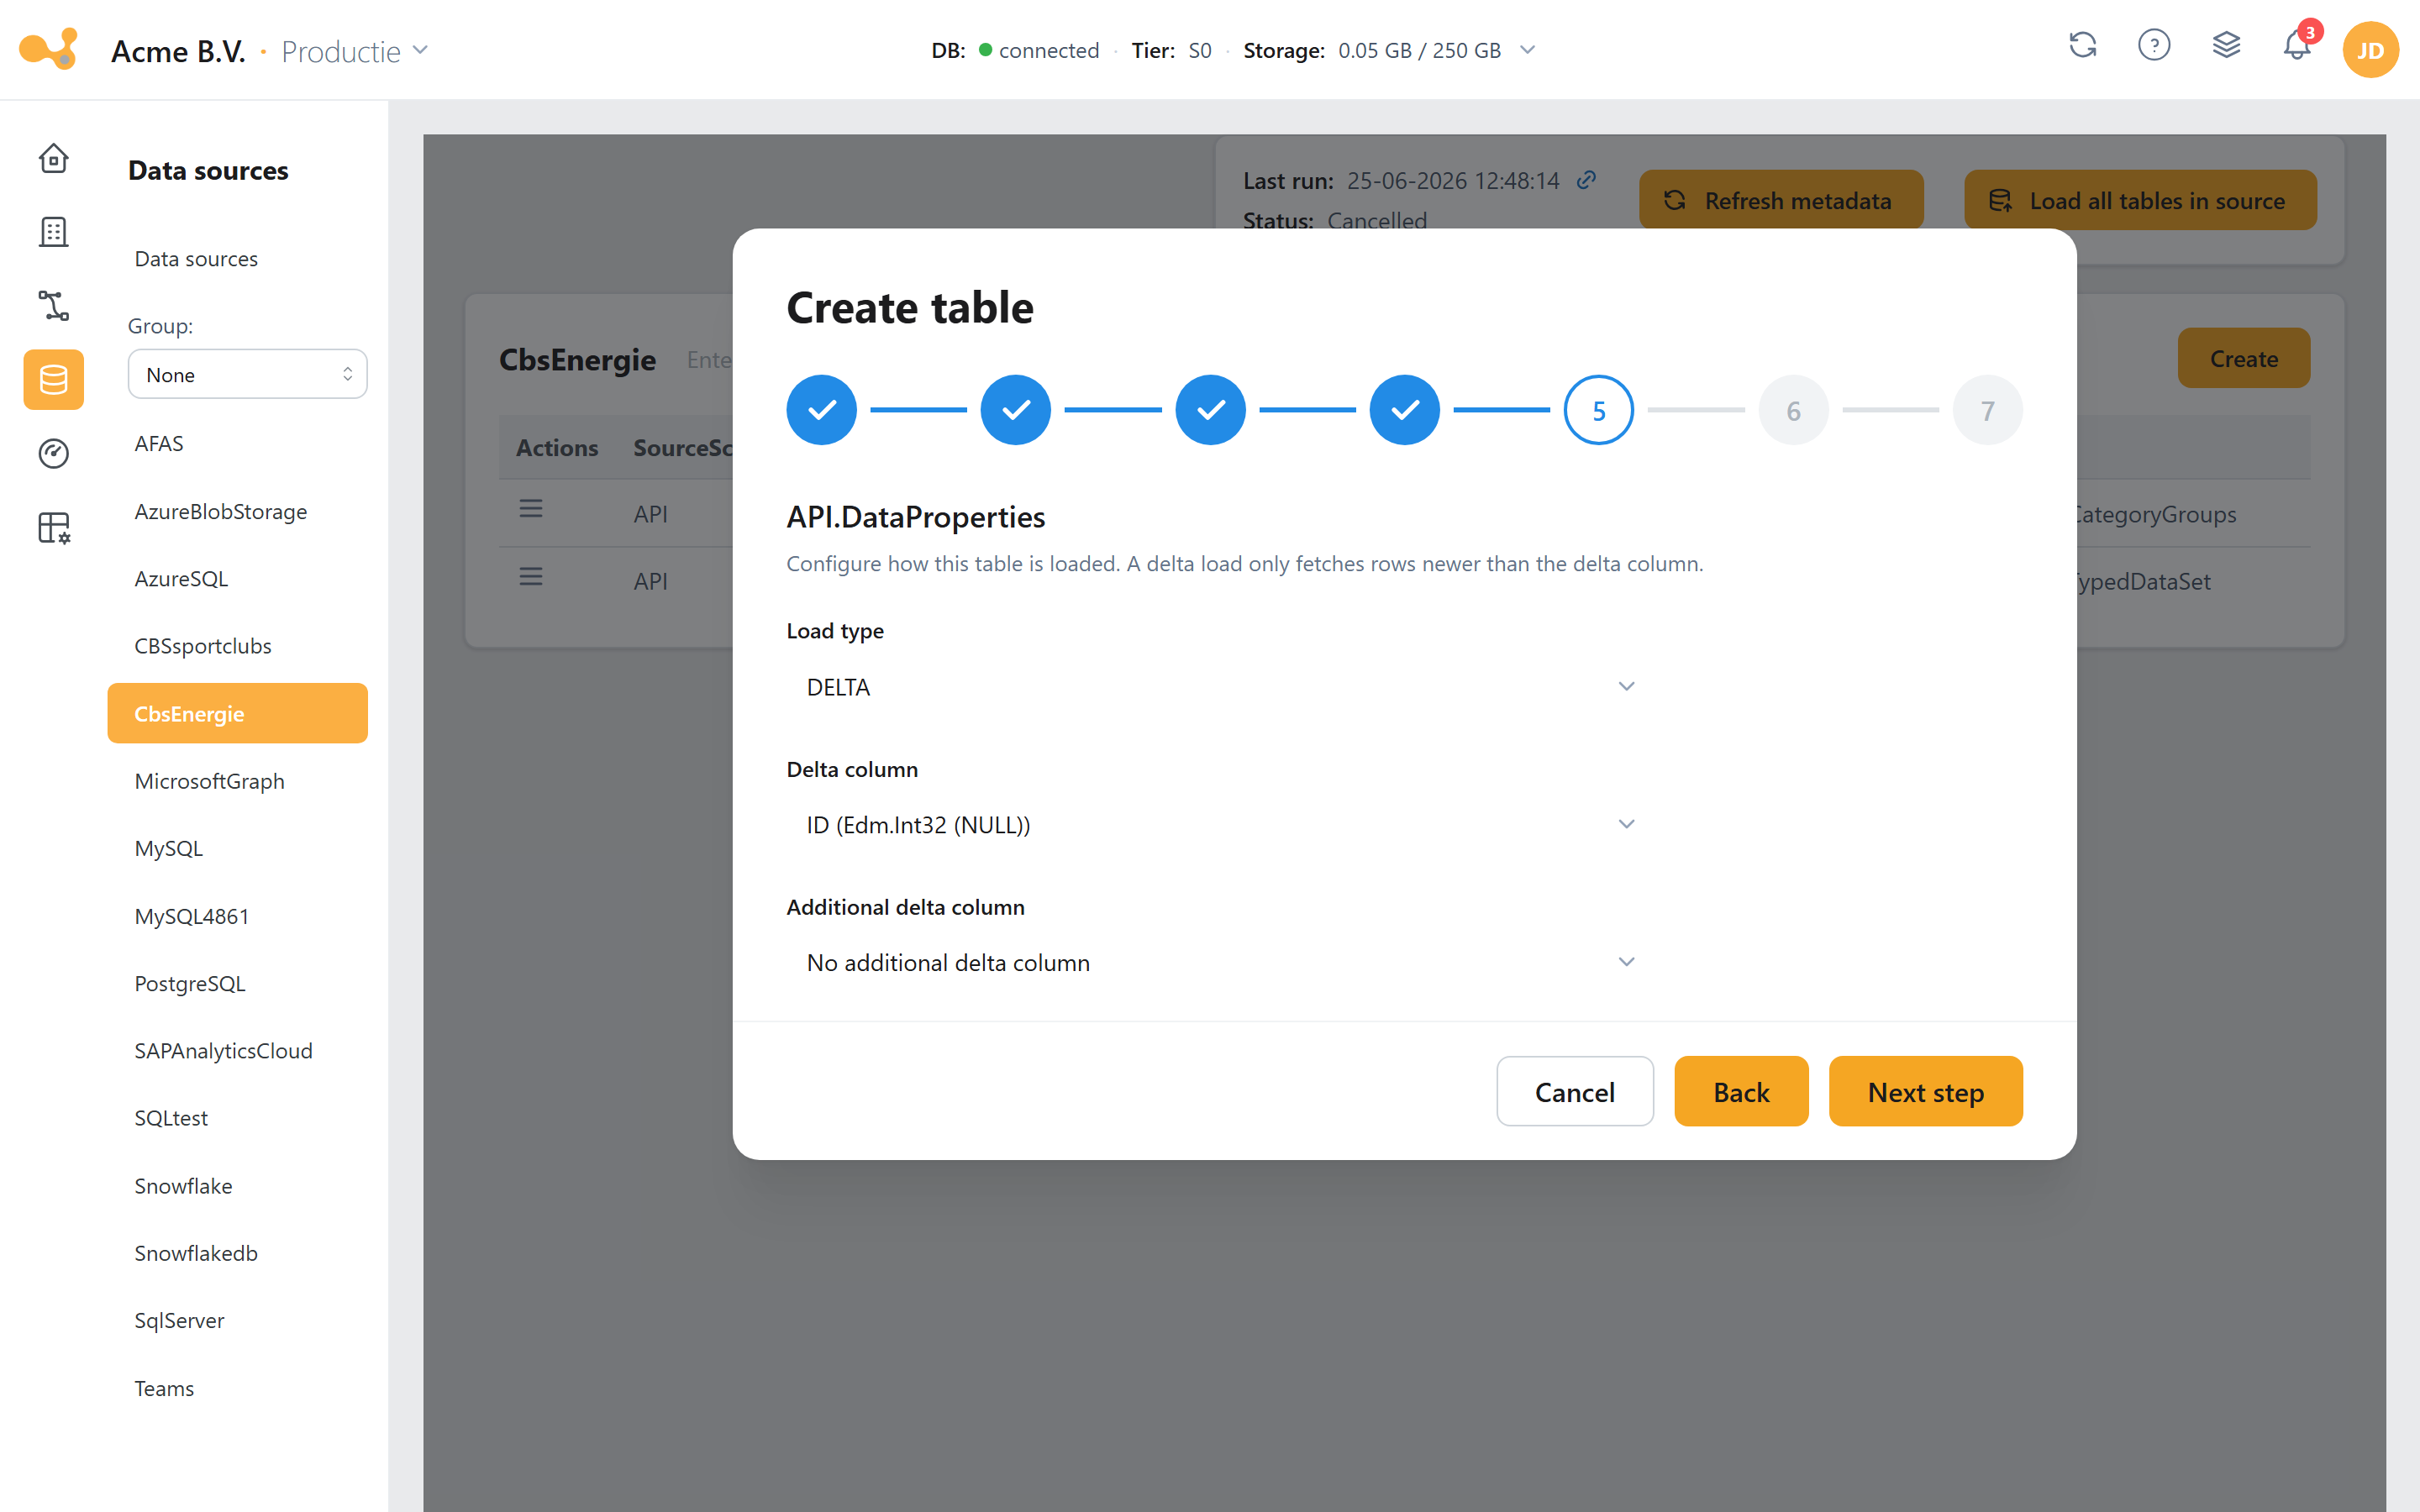 Load type — for a DELTA type you choose the delta column for incremental loading.
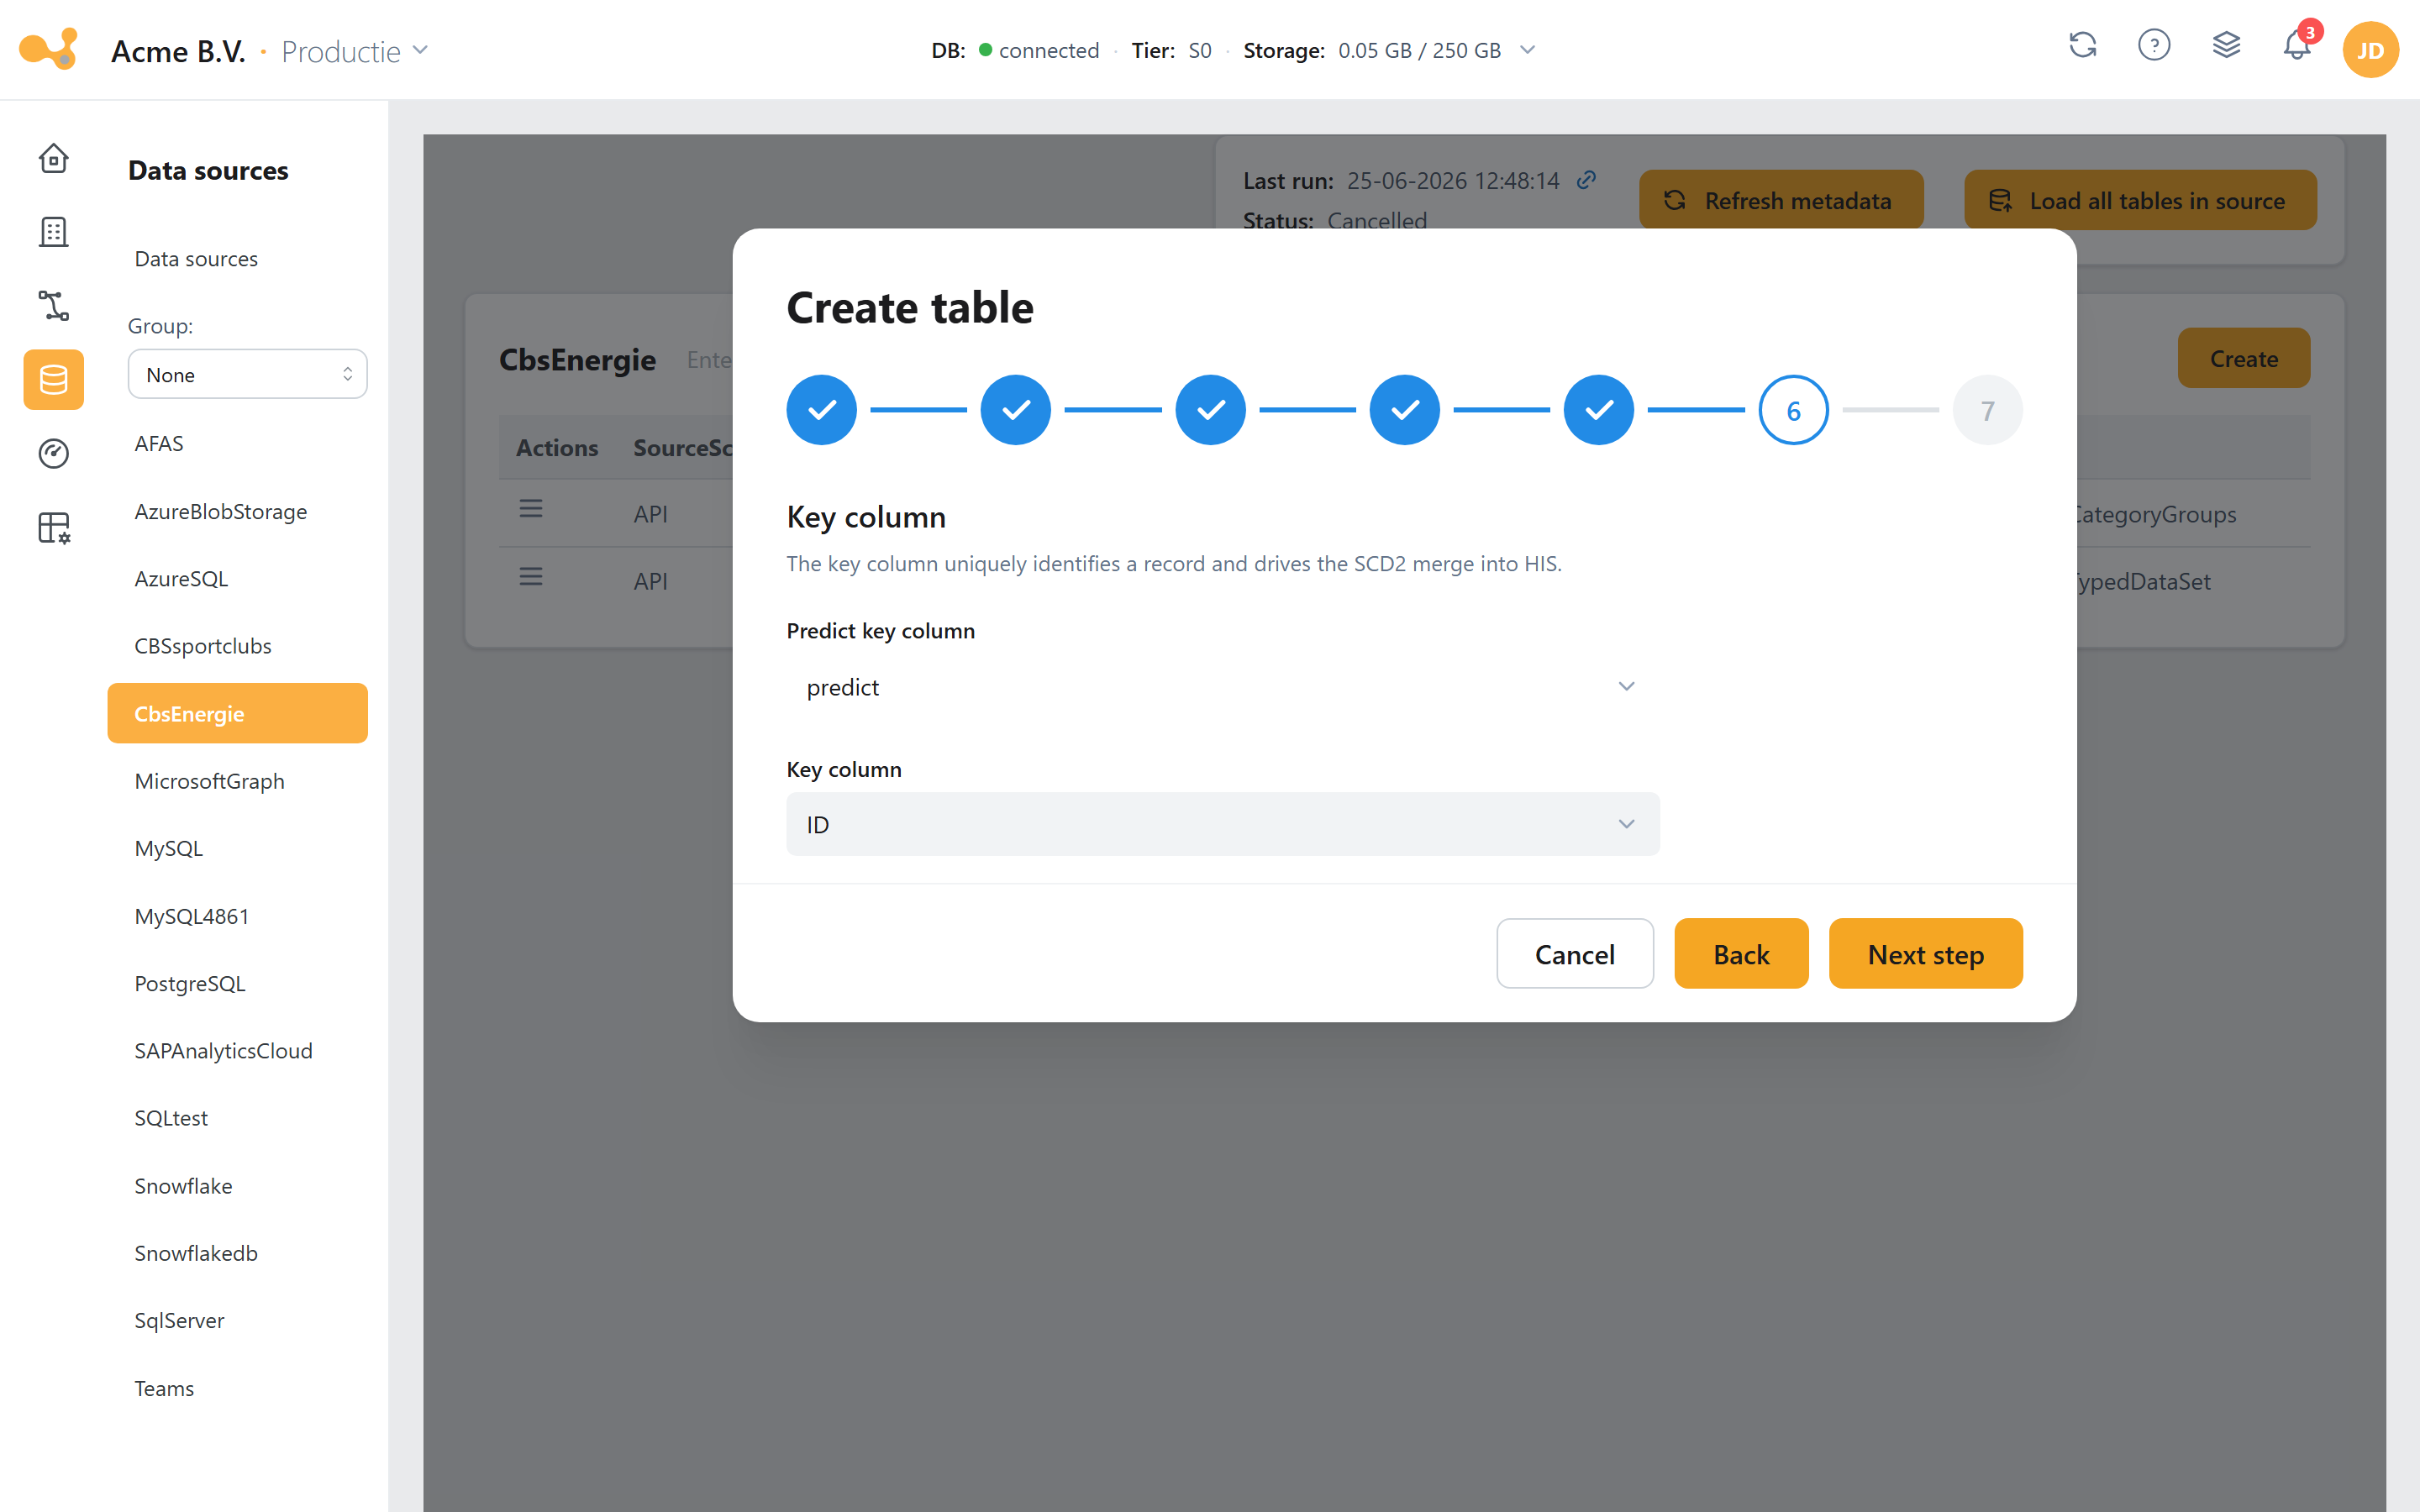 Key column — let Yres predict the key (predict) or choose manually (manual).
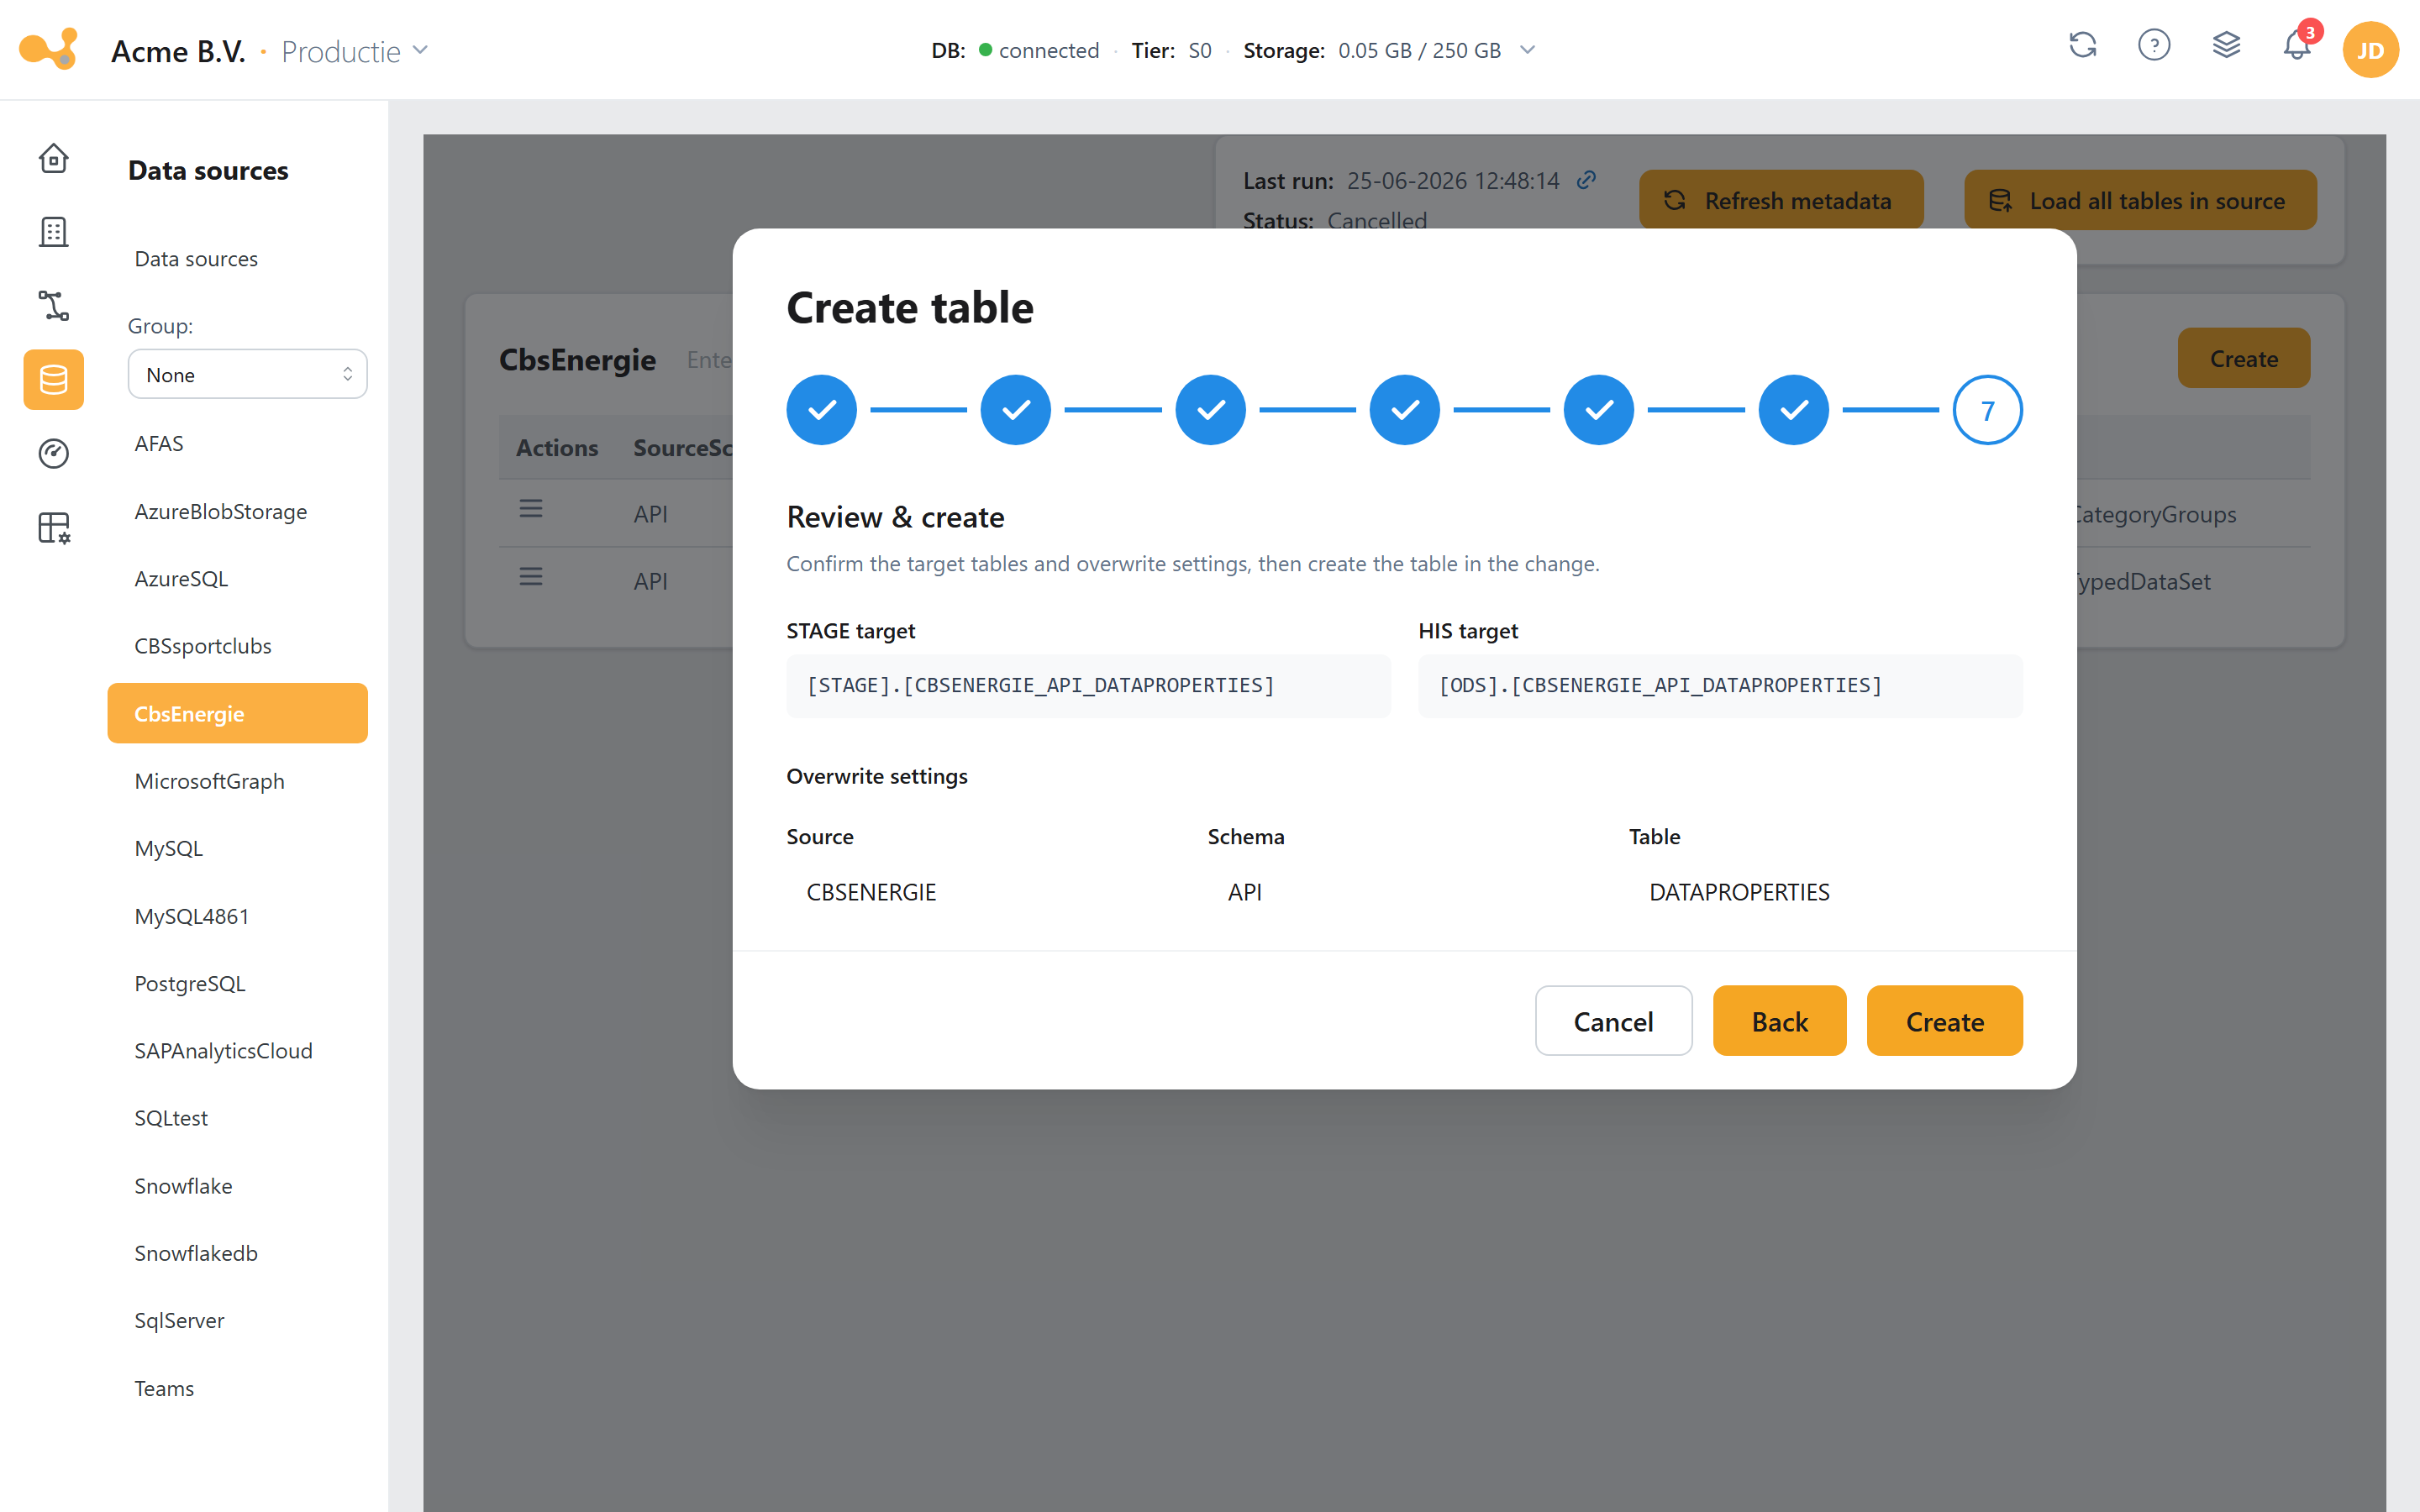 Overwrite — check or override the STAGE/HIS target names and click Create to register the table.
Adding a table registers it in LoadManagement, books a change under the chosen Change and creates the physical STAGE and HIS tables. No data is loaded yet — you do that afterwards via a load or a trigger.
4. Configure a load
During the Load type, Key column and Options steps of the wizard you record how the table is loaded.
Load type
Yres has seven load types that determine what happens to the existing history in the HIS table. They are recorded per table in LoadManagement.UsedTables.LoadType and can be overridden per run.
The full explanation of all seven load types — what they do to the history, when to choose which, and the common confusion between OVERWRITE (history gone) and RELOAD (history kept) — is on the Load types page. That is the only canonical source; this page deliberately does not duplicate that table.
In short: the Delta column and Additional delta column fields only appear when the load type starts with DELTA or is ADDITIONAL. The delta column comes from the columns selected in step 3 (LoadManagement.Dictionary). For source type SAP_BDC, the delta column is fixed to ETL_DATE.
Key columns
Key columns identify a row uniquely and determine the KeyHash — that is how the engine knows which STAGE row belongs to which HIS row. You have three modes:
- Predict — Yres predicts the key and shows the proposal (read-only).
- Manual — you tick the key columns yourself; at least one is required. By default only NOT NULL columns are shown; with "Show nullable columns" you also see nullable columns.
- No key — only available for
OVERWRITEandADDITIONAL. These two types do not match on a key, so there you may (and must) load without a key.
Delta columns
For incremental loads (load type starts with DELTA) Yres uses a delta column: an increasing change column with which only new or changed records are fetched. For SQL sources, two delta columns are supported — comma-separated in LoadManagement.UsedTables.deltaColumn, with the same data type; the highest value counts.
Two delta columns work on all SQL/database sources: SQL Server, Azure SQL Database, MySQL, PostgreSQL, Oracle, DB2, Sybase, Snowflake and OneStream (the engine uses an ANSI COALESCE, so MySQL is included).
What happens server-side
When you complete the wizard, Yres sends the entire configuration to the backend in one go, which starts the task chain "Add table <table>": the table is registered in LoadManagement, a change is booked under the chosen Change and the physical STAGE/HIS tables are created from the dictionary. During a later load, ADF copies the source into STAGE and then calls the SCD2 merge engine (LoadManagement.spLoadDWH → spHIS_InsertAndUpdate), which applies the configured load type.
Related pages
- Load types — the seven load types in detail (incl. OVERWRITE vs. RELOAD).
- History & SCD2 — how
KeyHash/RowHash,ETL_Date/ETL_EndDateandIsCurrentwork. - Data flow — how a single load runs from trigger to historized data.
- Data source requirements — connection fields and authentication per source type.
- Views, pipelines & triggers — running loads manually and automating them.