The change process (DTAP)
Your data warehouse never stands still: sources are added, tables change, you build new views. Yres lets you make those changes safely — you test everything first in a separate environment and only promote to production what is correct. This page describes that process from your perspective as a customer: what you do yourself, and what Yres handles automatically for you.
For the screens and buttons, see Projects & Changes. For the technology underneath (DACPAC, ADF publish, Azure DevOps), see CI/CD & DTAP.
The idea: dev → test → prod
Yres sets up your environment using the DTAP model: separate environments that each have their own role.
| Environment | What for | Who works here |
|---|---|---|
| Development (dev) | Where you build and change. The first environment is always dev. | You / your data team |
| Test (test) | Where you verify a change is correct before production. | You / acceptance |
| Production (prod) | The stable environment your reports run on. | Nobody edits here directly |
The principle: you only build in dev and you never edit production directly. A change travels as a single package, in a controlled way, from dev → test → prod, so your environments stay in sync and no half-finished work ever ends up in production.
If you have only one environment, this whole process is invisible: there is nothing to promote. Your changes are applied directly and the Projects section does not appear. The rest of this page is about organizations with multiple environments. See the license tiers for who gets how many environments.
The two units: Project and Change
You bundle all your work into two units, so it travels as a whole and stays traceable:
- A Project is a container with a name, description and due date — for example "AFAS expansion Q3".
- A Change is the unit you actually release and promote. Every edit you make in dev — connecting a source, adding tables, persisting a view, adding a scripted object via Database objects — is automatically booked under a Change. A Change always belongs to a Project.
So you don't have to track manually what changed: Yres collects it in the Change, and that Change is your transport unit to test and prod.
A change's journey — step by step
   DEV                         TEST                        PROD
 ┌───────────┐   release    ┌───────────┐   install      ┌───────────┐
 │  build    │ ───────────▶ │ validate  │ ─────────────▶ │  live     │
 │  (Change) │   (locked)   │           │                │           │
 └───────────┘              └───────────┘                └───────────┘
      1–3            4            5                6
You run this whole journey from the changes table: on the Changes screen (the Projects section → Changes sub-link) each change has a row showing, among other things, a Status overview (a progress indicator per environment — green when that step is done, grey when it still has to happen), a NextStep (the suggested next action, e.g. "Release on dev" or "Install on prd") and an Actions menu (☰) on the far right. You release, import and install everything from that ☰ menu — the actions you get are contextual to the status of the change. So you don't go to separate release or install screens.
- Plan your work — create a Project. Give it a name, description and due date. You collect your changes under this project.
- Build in dev. Connect sources, add tables, create persisted views, and add scripted objects via the Database objects (the object tree under Data Engineering). Everything you do is recorded under your Change. You load and test freely here — this does not touch test or prod.
- Review and check the Change. You see its content as a diagram (source → schema → table) or as a table (per object the load type, the delta column, and what happens if the object already exists). That way you know exactly what will travel.
- Release the Change. Open the change's Actions menu (☰) and, under dev ▸, choose release change. This locks the change: nothing can be edited anymore and it becomes a sealed, promotable package. Yres first checks the dependencies — if your change contains something that relies on another, not-yet-released change, Yres blocks the release and names that other change(s). This way you never accidentally take half-finished work along.
- Promote to test and validate. Open the Actions menu (☰) again, choose the target environment's submenu — test ▸ — and click Reinstall change. Yres brings your change to test and you verify there that the loads and structures are correct.
- Promote to production. Correct in test? Then open the Actions menu (☰), choose prd ▸ and click Reinstall change again. With that, your change is live — tested and confirmed.
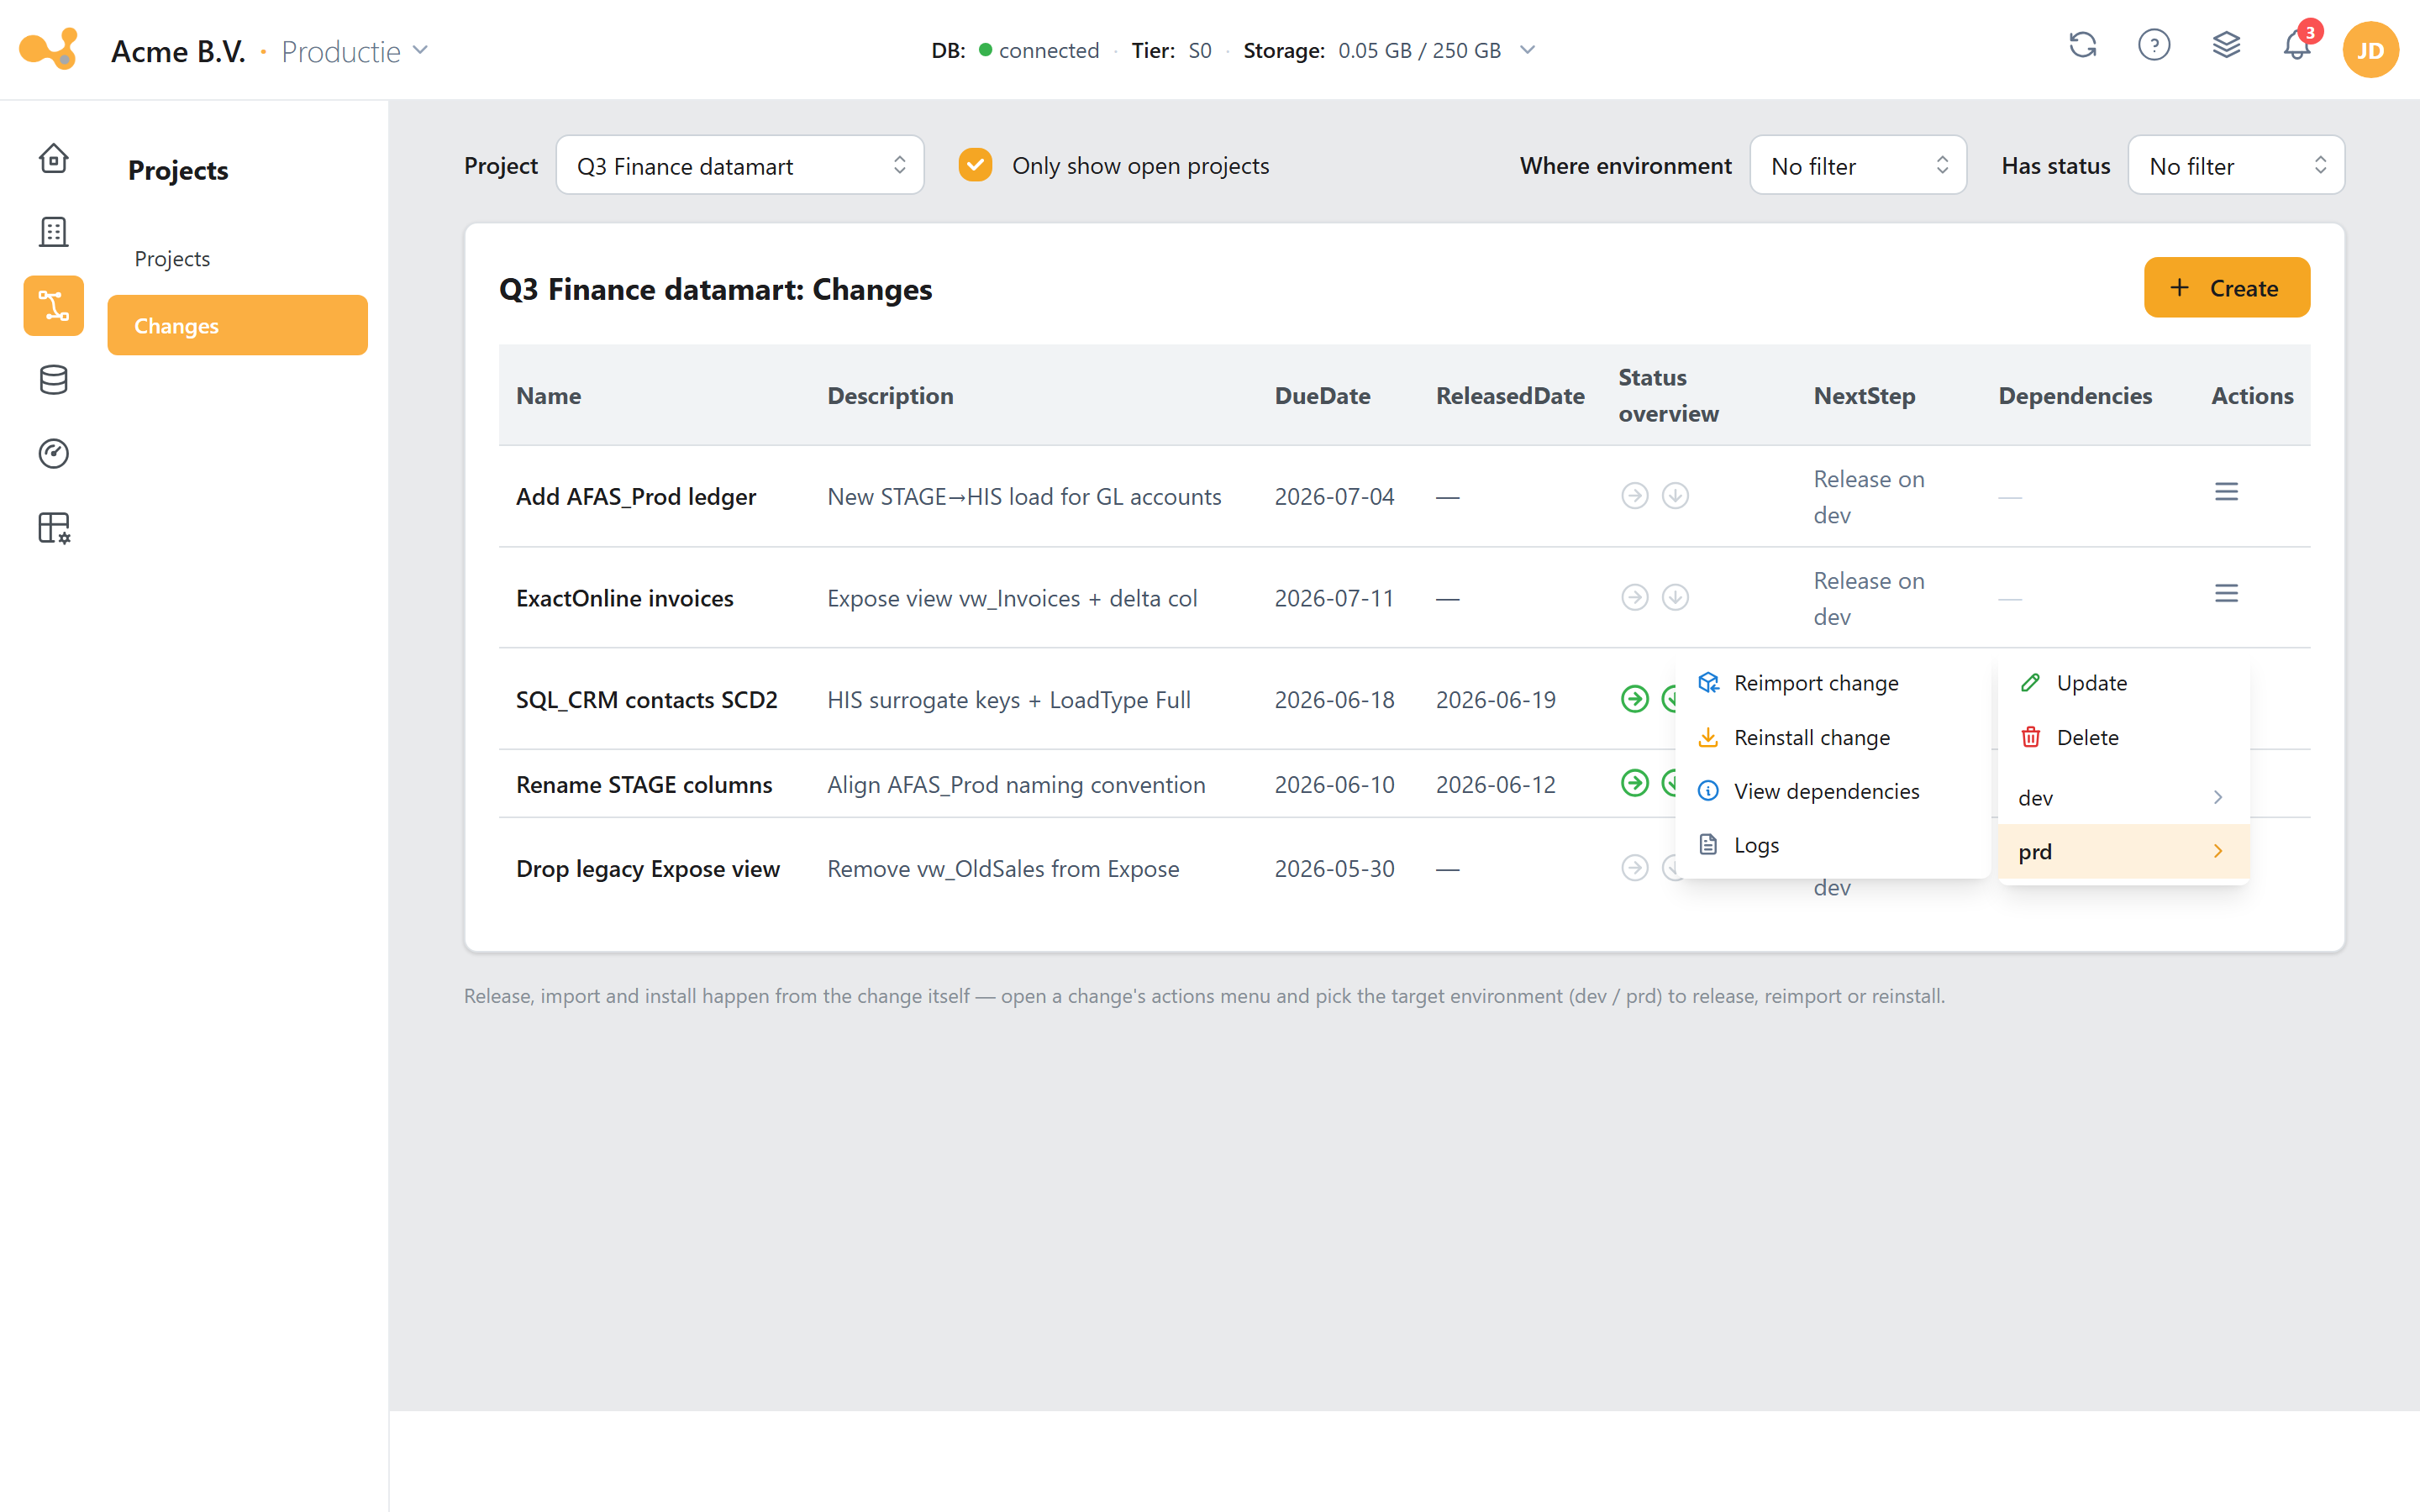
You release and promote a change from that change's Actions menu (☰): on dev you pick release change, on a target environment (test, prd) you pick Reimport change or Reinstall change. The progress appears as a notification, because publishing the pipelines continues in the background.
Import vs. install
In the target environment's submenu (e.g. test ▸ or prd ▸) of the Actions menu (☰), a released change offers two actions:
- Reimport change — brings the change into the data warehouse of the target environment only (calls
[Change].[spImport]). The ADF pipelines are not refreshed. Useful when you just want to stage the DWH structure. - Reinstall change — does the full job: the change in the data warehouse and republishing the ADF
pipelines (calls
[Change].[spInstall]plus thepublish-datafactorypipeline), so your new source pipelines land in the target environment too. This is the step that brings DWH and ADF in sync.
In most cases you choose Reinstall change. Through the same actions in the ☰ menu you can reimport or reinstall a change again later.
What Yres handles automatically for you
The nice part: at steps 5 and 6 you don't have to do anything technical yourself. Behind a single action in the ☰ menu Yres handles:
- Rolling out the database structure in the target environment (new/changed tables, views, procedures).
- Republishing the ADF pipelines so your source loads work in the target environment.
- Translating names between environments. A source called
ERP_DEV.Productin dev becomesERP_TST.Productin test andERP.Productin prod — Yres automatically adapts the change to the right physical objects per environment (the change deployment rules). - Guarding versions (see below).
Under the hood this runs
[Change].[spRelease],[Change].[spImport]and[Change].[spInstall], plus the Azure DevOps pipelinepublish-datafactory. The full technology is in CI/CD & DTAP.
The guardrails — why this is safe
Yres builds in a number of checks so you can't break production:
- Versions must match. Before an install, Yres checks that the DWH versions of the source and target environment are equal. If not, you get "Environment versions do not match, please update" and nothing is installed — first update the lagging environment via Update environments.
- Dependencies are checked when releasing: you cannot release a change that relies on work that has not yet been released.
- A released change is locked — nobody can quietly change anything after release.
- You cannot delete a project while it still contains open changes, and a change's due date must be on or before that of the project.
- Nothing goes to prod untested, because you always promote via test first.
- Your history is preserved. The load engine versions your data (SCD2), so a structural change does not throw away existing history. See History & SCD2.
If something does go wrong, you can roll back a load or change — see Rollback & reset.
A real-world example
Illustrative — a typical course of events, not a specific customer.
Acme wants to unlock their AFAS administration:
- A data engineer creates the project "AFAS connection" with a due date.
- In dev she connects the AFAS source, refreshes the metadata and adds the desired tables — all booked under the change "AFAS tables v1".
- She runs the first loads in dev and checks the data.
- She reviews the change content (is the load type per table correct?), opens the Actions menu (☰) and, under dev ▸, chooses release change.
- She opens the ☰ menu again, chooses test ▸ Reinstall change, runs the loads in test and has a colleague validate the reporting.
- Approved? Then in the ☰ menu she chooses prd ▸ Reinstall change for the same change. The AFAS data is live, and dev, test and prod are in sync again.
For a new source of an existing type (as above) there is usually no code change needed — these are metadata rows that the install flow promotes neatly between your environments.
Further reading
- Projects & Changes — the screens, buttons and fields
- CI/CD & DTAP — the technology: DACPAC,
adf_publish, Azure DevOps - Rollback & reset — roll back a change or load
- Data flow and History & SCD2 — what a load does to your data